|
Model Subject:
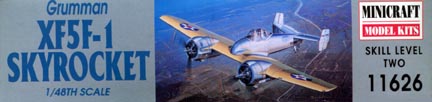
Grumman XF5F-1
Kit used:
Minicraft, kit number 11626
History of the actual aircraft:
With the USAAC already having a twin-engine, long ranged
pursuit escort fighter on the drawing board and both Germany and Great Britain
also testing examples of this type aircraft, the Navy Bureau of Aeronautics
approached Grumman Aircraft for a proposal on a twin-engine pursuit escort
fighter for fleet operations. Grumman's approach was the G-34 (XF5F-1), which
was to be developed through three distinct versions with a short-nose and one
with a long nose.
The model I have done depicts the first configuration of
the short-nose version, which first flew on April 1, 1940 with R. A.
"Bud" Gillis at the controls. Bob Hall, now a retired Grumman
vice-president, took over the test program until November 1940, when
"Connie" Converse assumed the test pilot role leading to the final
Naval demonstrations in the short-nose version. Bob Hall completed a total of
twenty-five flights averaging 3/4 of an hour in the first configuration during
the one and a half months following the initial flight.
These tests showed excessively high engine temperatures and
a second configuration was made using modifications in the oil-cooling duct
along with changes in the gear doors. Altogether the XF5F-1 went through four
basic modifications after configuration one. During the second modification
the exhaust systems was given ejector exhausts, which replaced the exterior
exhausts. The third modification was the addition of the fuselage-to-wing
fillets and new balanced rudders. The final modification was the extension of
the nose past the leading edge of the wing, lengthened engine nacelles with
two side opening gear doors which covered the tires, enlarged and revised
rudders, and deletion of the canopy side braces. The propellers were also
given spinners in the final modification.
The XF5F-1 was last flown on December 11, 1944. Due to an
undercarriage retraction failure the plane had to belly land and damage was so
extensive that the unique plane was struck off the active list. Although the
XF5F-1 never was put into production, it and its USAAC cousin XP-50 served as
the testbed for Grumman's F7F series of twin-engine fighters. The XF5F-1 was
never really given a name by Grumman, it was said that a newsman viewing the
aircraft during 1941 stated that it "climbed like a skyrocket" and
the name stuck. One wonders what brand of cat this nimble little aircraft
would have been given had it reached production. The test plane had done 211
flights totaling 155.7 hours during its nearly five years of testing.
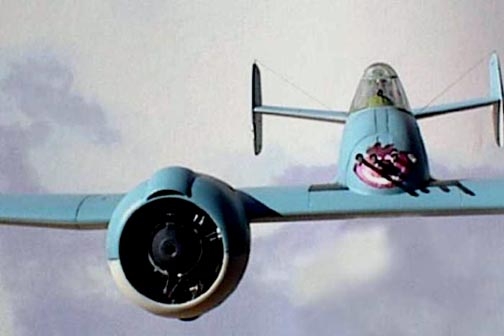
My model is strictly hypothetical and is done, as the
actual aircraft may have appeared had it reached production status during
1942. Since few ever saw the aircraft and it never received a cat motif, I
decided to name it the "Hepcat".
Additions, modifications, etc.:
Interior:
Although the fuselage parts were well modeled and accurately represented
the XF5F-1, the sidewalls were not molded at all, nor was there a bulkhead to
cut off one's view into the rear of the fuselage. Using photos from Steve
Ginter's book of the XF5F-1 (a must have for serious modeling enthusiasts of
this kit or the long-nose configuration) I scratch build sidewalls and a rear
bulkhead from sheet styrene and Plastistrut I-bars and angles. The interior
was painted Polly Scale Interior Green with the seat paint bright silver and
instrument panel and sidewall controls done in black and Reheat Models
instrument decals and control placards.
The barrels to the nose guns were cut and holes drilled in the breeches to
except new barrels from 25-gauge hypodermic tubing and perforated gun cooling
jackets in the final assembly. The breeches were painted Tamiya Gun Metal,
with the ejection chutes painted bright silver, and cemented into position on
the upper wing half. The gun scope was drilled out a little at both ends,
painted semi-gloss black, and given a drop of Krystal Klear in each drilled
hole. I held off attachment until final assembly.
The pilot was culled from my stock of 1/48 scale figures. The figure was
primed in neutral gray and hand painted using acrylics. Shadowing and
highlights were done with artist's inks and powdered pastels respectively. I
held off attachment of the pilot to seat and seat to lower wing until final
assembly to facilitate masking the open cockpit for exterior painting.
Engines:
The engines are really well done, but what were those rods coming out of
the ignition wiring harnesses? They are certainly not pushrods, because they
only go halfway up to the cylinder ends. I removed the wiring harness from the
attachment ring, cleaned the ring and cemented it to each engine front as
called for. I saved the wiring harnesses, but cut the rods from them and
drilled #80 holes for ignition wires made from phono pickup wire. I also
drilled eighteen #79 holes in the attachment ring on the engine to accept new
pushrods constructed from fine copper wire.
The engine was first painted engine gray, after which the cylinders were
painted Polly Scale Oxidized Aluminum and the pushrods black. The ignition
harnesses were painted silver and the ignition wiring left in its aluminum
finish but given a coat of clear flat. I made exhaust collector rings from
non-flux solder and painted these Gunze Burnt Iron. The collector rings were
attached to the rear of the engines after the rest of the engine assembly was
completed and both engines set aside until painting of the wheel wells and
cowlings was completed/
The wheel wells and inside of the cowling pieces were painted Polly Scale
Chromate Yellow. I had originally planned to do a gear down version of this
kit, but the gear bay was so spartan for this scale and the landing gear
struts are very difficult to attach correctly, that I decided to do another in
flight. This may be the only true debit to this kit; it could definitely use
some aftermarket help in the gear bays. I used the main strut and the wheel
only. The wheels were painted Polly Scale Tire Black and the struts silver.
They were cemented in the closed position and the wheels masked with strips of
masking tape.
Exterior:
The entire model was assembled before painting the exterior, with exception
of the vertical tails and canopy. I drilled out the openings of the exhausts
and made two exhausts from styrene tubing. These were painted burnt iron and
attached in the finals. I also attached the two wing lights after painting the
area behind them silver. This made it easier to sand them even with the wing
form. I cut and filed out the gun camera position in the port wing and paint
this area black before attaching a small Waldron punched disk of Bare-metal
foil. This was filled with gel-type CNA and sanded back to the wing edge, then
polished and masked. Wing lights were masked with Elmer's, which works very
well on small clear areas and comes off very easy after dampened with a little
water.
Antenna posts were cut from fine wire and cemented into predrilled holes on
top of each vertical tail. Likewise, I drilled two holes for the wires
attachment into the fuselage sides where indicated in drawings. The rear
landing gear had to be attached before cementing the fuselage halves, but I
left if free from glue. The actual aircraft had a fixed rear gear, but I used
artistic license since I was doing a hypothetical model and pushed the gear up
as it would possibly appear retracted. The tailhook was painted separate but
at the same time as the model. It was installed in the final assembly.
Painting and decaling:
After masking after masking off the cockpit and instrument shroud with card
stock and masking tape and the engine openings with circular cone masks made
from index card stock, I sprayed the entire model with Polly Scale Navy Light
Gray, which is correct for the undersurfaces of my hypothetical model. The two
canopy pieces were masked with Bare-metal foil on the exterior and masking
tape on the interior and first given a couple coats of interior green.
Once the light gray primer was sanded and reprimed where needed, I masked
the undersurfaces and gave the upper surfaces and the two canopy pieces two
coats of Polly Scale USN Blue-Gray. Masking was removed from all undersurfaces
and the model was given two coats of FUTURE to prep it for decals.
The only kit decals I used were vertical tail IDs. I cut the "X"
from the XF5F-1, as my hypothetical model represents a production model.
National Insignia and the number "9" are from Superscale decal
sheets. The vertical tail landing stripes were done with white and dark blue
trim film. I made the nose decal in Adobe and run it off on my InkJet printer
using the new SuperCal decal film especially made for InkJet printers. It did
marvelous and once treated with an Artist's fixative, it went on without any
bleeding or hassles. Since I needed white for the eyes and mouth of the figure
and did my decal on clear film, I had to first cut a decal from white trim
film using a template made from a paper copy of the image used on the decal.
This was applied prior to attaching my homemade "Cheshire Cat"
image. Wing walks were cut from black trim film using template I made from
card stock.
Once the decals were dried and cleaned, I sealed all in a coat of FUTURE
before applying a finish coat of Polly Scale Clear Flat. The navigation lights
at the top of the fuselage and at the rear of the fuselage were done using
Waldron punched disks of bare metal foil and a drop of Krystal Klear. The
navigation lights were painted clear red and clear green where indicated, with
the rear light remaining clear.
Caz
|