|
Kleine
Brogel
Last
year I was at the Spotters day at Kleine Brogel in Belgium when I saw for the
first time the F14B Tomcat from VF-103, the Jolly Rogers. Two
planes attended the Spotters day, the CAG bird and a low visibility Tomcat,
which carried a LANTIRN Pod. A couple of weeks later, I bought the
Hasegawakit 7023.
Reference
The
Hasegawa is a complete kit with a lot of details. You can build the A, B and D
version of the Tomcat with it, including the two types of engines.
There
are several items included, which belong to a F14B but which the manual
doesn’t mention, for example the ALQ-126 Mid- & High-Band Antennas
(wing-glove). Therefore I suggest you study reference pictures very well in
order to build a real model.
Also
the website of M.A.T.S, the F14 Tomcat
Reference Work by Torsten Anft is a very good reference (http://www.anft.net/f-14).
I also used the walkaround book by Verlinden with many detail pictures of the
Tomcat.
Finally
I used two pictures of a Vf-103 Tomcat, which flew during the Kosovo War.
| This
F-14B of Vf-103 carries a LANTIRN pod on station 8B, balanced by an
AIM-54C on 1B, but offensive armament is limited to a single Mk82 on
station 3. |
|
| Vf-103
deployed to the Adriatic aboard the USS Enterprise with its LANTIRN-equipped
F-14Bs, but did not drop bombs in anger. |
|
Conversion
I
started to convert the F14D RIO cockpit from Black Box to the F14B version.
Therefore,
I used some sidepanels from the original kit to replace the Black Box sidepanels.
Also the Multiple Display Indicator from the Hasegawa kit had to be installed
into the Black Box set, because the F14D version
lacks this one. The same happened to Detail Data Display Panel.
|
click on
the image below to see larger photo |
 |
|
The conversion of the Black Box RIO cockpit form F-14D to the F-14B version.
The grey panels are from the original Hasegawa set.
|
|
click on
the images below to see larger photo |
 |
 |
|
Left side of cockpit |
Right side of
cockpit |
It was hard to fit the Black
Box cockpit tub to the Hasegawa set. A lot of grinding had to be done,
especially piece no. 4 “the Front Panel” of the Black Box set didn’t fit
at all.
Construction
of the main body was easy. Some grinding had to be done but this was minor.
I
didn’t use the Eduard hinges for the geardoors, because these hinges were too
small. I simply made the original hinges smaller by polishing them.
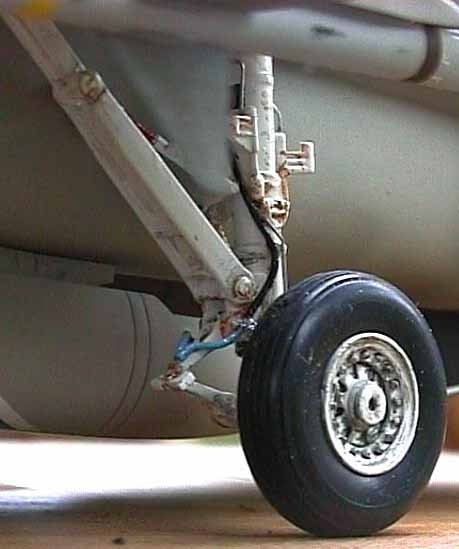
Gears
The
landing gears took a lot of work because I also constructed the main hydraulic
ducts. For this I used plastic tubes from 0,1 mm to 0,5 mm (Picture 6, 7 and 8).
|
click on
the images below to see larger photo |
 |
 |
|
Detail of main gear |
Hydraulic lines |
I also made the actuators
that operate the geardoors. Unfortunately they are hard to find in the end
result.
 |
|
Nose gear |
Wings, hook
and airbrakes
| There
are two options to construct the wings, namely in spread position or in the full
afterwards position (see picture directly below)
|
 |
|
Model from above,
wings in the aft position |
|
Due
to the fact that the plane with spread wings would be too large to fit in the
display cabinet, I had to construct the lesser interesting position although in the
spread position you are able to construct more details (extended flaps en
slats).
The
swing construction of the wing is solid so you will always be able the swing the
wings to another position.
The
arresting hook can be extended.
| The
airbrakes can be constructed in the extended position, which I did,
although I have never seen a Tomcat, parked on the flightdeck with extended
airbrakes. But I thought it was more interesting to construct the airbrakes this
way.
|
|
click on
the image below to see larger photo |
 |
|
Extended
airbrakes
|
|
Weapons
I
decided to make a Bombcat.
| In
a magazine, I found a picture of a VF-103 Tomcat, flying above Kosovo with one
Mk 82 bomb (see 1st picture in this article). This configuration I recreated, but choose to take two
Mk83 Iron bombs.
|
 |
| Detail
picture of bombs including ejection racks |
|
I constructed two front
pallets to hold the Iron Bombs. I made special ejection racks for the
bombs, which are not included in the Hasegawa kit.
On
the wing, the Tomcat on picture 1 carries one Phoenix missile (a Tomcat without
a Phoenix isn’t a Tomcat) (see picture below on left). The other stations of the model got
two Sidewinders and a Sparrow (see picture below on right).
|
click on
the images below to see larger photo |
 |
 |
| Phoenix and
Sidewinder missile |
Sparrow and
Sidewinder missile |
On the aft position at the
belly I glued another Sparrow.
Weathering
The
Tomcat on the picture had flown often, so it was very dirty. I
tried to weather the model exactly like the Tomcat on the picture. The
housing of the engines is very dirty but to the front, the Tomcat looks clean. The
missiles are relative clean and contrast with the bodywork.
I
gave the model a flat coat.
John
|