|
The
Heinkel He 219 was probably the most effective night fighter ever built, but was
never a true success as it was a victim of political blundering and prejudices
as a result of the Reichluftfahrtministerium’s
(RLM) dislike for Heinkel. Started
as a private venture, the Uhu was way ahead of its time, featuring ejection
seats, tricycle landing gear, a pressurized cockpit, and excellent forward
visibility in a framed bubble canopy. The
A-7 was the final, most advanced version of the series, equipped with FuG220
radar, and two dorsal 30mm Schrage Musik
oblique-firing cannons and two sets of 20 or 30mm cannons in the wing roots and
ventral tray. Only 268 were built,
and today one is being restored at the National Air and Space Museum’s Gerber
facility.
| I built this kit
with the intention of taking a break from building older or limited run
kits, and also to keep myself busy while I waited for some KMC interior
sets for another project I was working on.
Going through my small stash, I dug into the box labeled “sanity
kits,” which are mostly Tamiya kits, and figured, “man, this Uhu looks
downright sinister. I’ll
build this.” Man I tell ya,
this kit was more trouble than I thought!!! |
|
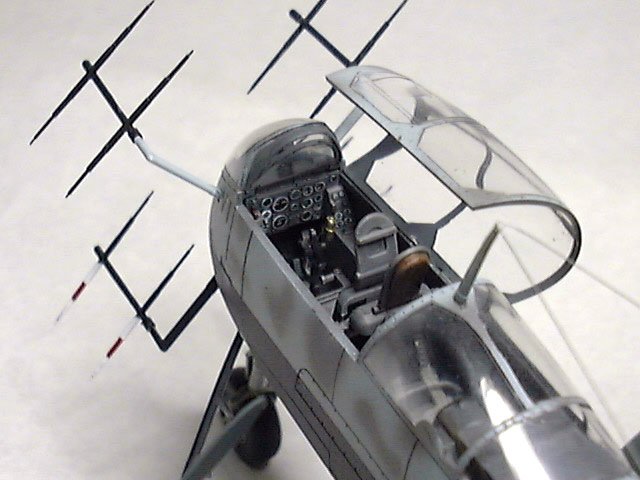
First off, the one thing that really gets me wild about this kit is
the fact that the cockpit tub is a single large chunk of metal, which
solves the problem of how to keep the plane from being a tail-sitter.
The plastic components of the cockpit fit on top, and the lower
portion of the tub becomes the wheel well.
I sprayed the tub with laquer primer to prep it for paint, and then
painted the cockpit with Model Master Acryl RLM 02.
The cockpit components fit in without any trouble, is fairly
detailed, but I think Tamiya could have done a little better, as the rear
cockpit is a little bare (top photo on right).
The instrument panel detail is in decals, and come in three parts
(bottom photo on right). A
word of warning – if you intend to use the decal seat belts,
don’t be a goofball like me and apply it directly to the seats.
I did, and when I sprayed a flat coat over the cockpit the
seatbelts were blended into the raised detail, making the seatbelts look
like they were painted on. Transfer
them to a piece of aluminum foil and stick it to the seats. |
| Click
on image below to see larger image |
 |
 |
|
Assembly over the rest of the airframe was without problems with the
exception of the engine nacelles, which was a little too wide at the roots.
The result was a little extra plastic sticking out at the sides.
I think this was more of an error on my part, however, as the forward
nacelles were in halves, and the halves may have shifted apart while the glue
was setting. If this happens to
you, sand off the access in the root area.
The rear nacelles did not join to well either, leaving a small but
noticeable step in the halves. I
thought this was also an error on my part, but the wing halves on which the rear
nacelles were molded on lined up perfectly.
Other than what I mentioned you wouldn’t have too much trouble with
fit.
There are one or two areas which need to be addressed for a little more
accuracy without having to go aftermarket, depending on what options you choose
– toss out the blade antenna (part A36), which was supposed to represent the
FuB1 2F “towel rack” antenna, and scratchbuild a new one out of stretched
sprue. Also, if you decide to have
the boarding ladder swung out, you’ll have to open up the panel where the
ladder is stored.
| Tamiya took some liberties with
the Peil G6 suppressed D/F aerial cover (part E1).
Rather than make the aerial two parts, with the box and the
star-shaped blade, the shape of the blade is molded into grooves under the
clear cover. In order to give
the impression that there is a blade under the cover, paint the entire
inside of the cover with Model Master Metalizer Aluminum, but don’t seal
it. You have to use the
Metalizer line, as this stuff comes off easily.
Once it’s dry (10 minutes), lightly polish the raised surface
with a tri-grit buffing stick until the paint on the raised detail is
gone, leaving the paint in the grooves. Ta-da!!! |
| Click
on image below to see larger image |
 |
|
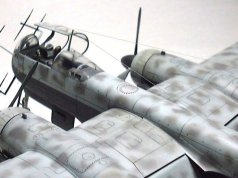
I wanted to paint it in the overall RLM 76 with the tiny RLM 75 mottles,
as the markings were a little more colorful, but I was drawn to the more
sinister-looking paint scheme with the black undersides of 1./NJG1.
I would suggest first painting the black undersides, sealing them, and
then masking off the lower areas and spraying the RLM76 on top.
The decals are made by Scale-Master for some reason, which are really
thin, and quite strong, but a little off register to my annoyance.
The iron crosses are a little short on the black portion, so you’ll
have to touch up two sides of the cross. Other
than that the decals are satisfactory.
The antennas are a pain – there are antennas everywhere!!!
If the front and rear antenna blades weren’t fragile enough, the
scratchbuilt FuB1 2F antenna was pretty fragile, and I had to be
obsessive-compulsive enough to add antenna wires as well!!!
I have no idea how I’m going to transport this to the next IPMS meet.
|
Click on images below to
see larger images |
 |
 |
Weathering was accomplished by mixing brown and black pastels in a soap
and water solution, and brushed on to the panels, to be wiped off by a cotton
bud after the mix has dried on the panel lines.
I also weathered the exhaust shrouds by shooting a little Model
Master’s Metalizer Burnt Iron on the ribs on the shrouds, and added exhaust
streaks with brown pastels. Finally,
a touch of black pastels added some exhaust stains on the gun ports.
Overall this turned out to be a fairly easy build, with the little extra
work to spruce it up. It’s also a
pretty big plane – make sure you have a lot of display space.
On the Super Tom Fun-O-Meter I give it an 8 and a 10 on the Super Tom
Cool-O-Meter for deadly sinister looks. Have
fun, enjoy, and I’ll see ya all in the chat room!!!
Tom
|
|