Hello, my name is Todd m
Perry and I reside in Columbus, Nebraska. I was born in Pasadena, California
Feb/03/70,and moved to Fremont, Nebraska at the age of two, and now reside in
Columbus, Nebraska. I became interested in models at the young age of eight. I
remember watching my dad’s friend building an old monogram C-47 Sky train,
from then on I had a deep curiosity of airplanes especially WWII era American
bombers and fighters. Over the past years I have continued to build, as well as
concentrate on the details of aircraft and it’s history. 1/48 scale has been a
favorite of mine since I can remember, seems to have a lot more detail than
smaller 1/72 kits. This also proves a little challenging, as this scale is
exceptional for adding extra detail to build a more realistic kit. Model shows
also became an interest of mine, as they offered a place to go and show your
work as well as meet people with the same interests in modeling, covering vast
array of subjects. This also encouraged me to build different types of kits such
as automotive, science fiction, and especially dioramas of aircraft. This opened
a whole new world to me in aircraft modeling, as I found them to be more of a
realistic setting for aircraft I wanted to build and seemed to produce a time,
setting, and a story that every aircraft holds within itself. As the last few
years passed I found that dioramas were my strong point and couldn’t get
enough of building them, even if it was a small setting, such as just a runway,
a few figures alongside the aircraft, or even the snow covered fields and
runways in Russia. In the last several years I have acquired a vast array of
trophies, ribbons, and plaques, which now accompany my creations. These have
inspire me to try new things with kits, such as scratch build parts/items that
cannot be found as well as adding extra interior/exterior detailing.
As I grew up, and now in
my 30’s,I began to realize that all of these kits were actual aircrafts that
performed various rolls in the war. This lead to my interest in heavily
researching aircraft and learning about the actual plane itself, as well as its
crew, where it was stationed, surrounding areas, its roll in the war, etc. This
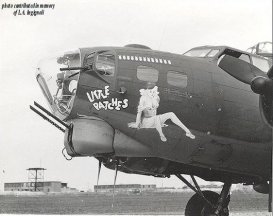
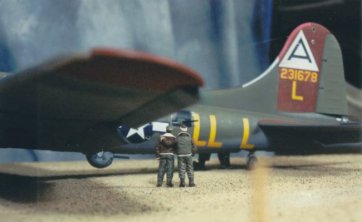
in turn led to my latest diorama, a B-17G named “Little Patches”, and how
this project came to be.
In late winter of 1999 I had just finished up another small aircraft diorama and
started thinking about what I was to build next. All of my life I have been a
big fan of the B-17G and starting looking through books/web sites/ or anywhere
else I could get information on them. In return it gave me even more inspiration
to do a large-scale B-17G as well as possibly a diorama. While browsing through
Squadrons “Walk Around b-17 Flying Fortress”, I stumbled across the back
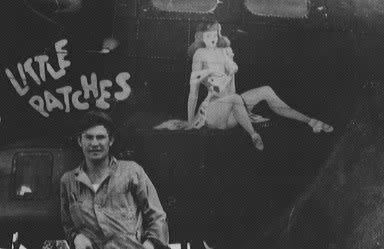
cover, which had a watercolor painting of a B-17g by Lou Drendel/1998.It was a
camouflaged B-17G and wore the name “Little Patches” as well as a large
pin-up girl on her portside nose. This was it…the plane I had been waiting for
to catch my eye, but was very cautious, as it was a painting and not a photo of
the actual aircraft. Curious as to whether or not this B-17 actually existed, I
started digging for information on the Internet and in various books I could
find, as well as web sites. I’ll admit I was new to the Internet thing and
computers were not easy for me to understand when it came down to hunting things
down…and due to this problem, I found very little information on Little
Patches. When time permitted I jumped on the web and looked some more for this
mysterious aircraft and yet still little information came to me, and this fueled
my desire to learn if this aircraft was real.
Then it happened one day
in early May/2000…I stumbled upon a web site (www.91stbombgroup.com), which I
learned she was assigned to, and proceeded to do a “site search” on
“Little Patches”. That was the turning point as I received a lot of
information about her as well as seeing real photos for the first time! It had
been about 6 months now trying to find little patches, and by now I was ready to
start building. I still was not comfortable on starting the kit until I knew a
little more about this subject I planned on building. So I started hunting for a
1/48-scale monogram b-17g as well as the Promodeler version, and also all the
detail sets I could find. Decals also proved to be quite a challenge as I found
out they were discontinued, but luckily stumbled across some from Aeromaster
decals and ordered 2 sets (just in case!). In the mean time I decided to run an
ad in the guest book archive on the 91st bg web site on May 16/2000,and
explained my eagerness to start a model of “Little Patches” and was looking
for information or leads for my project. This proved to be the most valuable
thing I have ever done as far as models and research goes, soon after this
posting…my outlook on modeling changed forever.
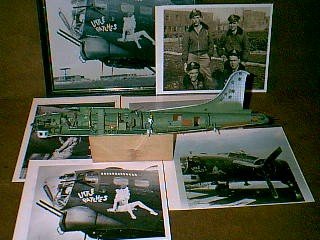
This project was started in late November 1999, and I have just recently finished
it in late February of 2002. It features a 1/48th scale B-17G “Little
Patches” from the 91st BG/401st BS, stationed at Bassingbourn , England
in 1944/45 during WWII. I spent the last 2 years researching and building this
kit as well as designing the diorama. Several contacts were made during this
project, some of which were actual crewman who flew in Little Patches in the
war. Their help was very crucial in the project, as they supplied me with actual
photos, and critical information regarding the aircraft itself as well as her
hardstand, an area where she was kept parked between missions. Several Veterans
also sent me their only negatives, photos, prints, to aid me in my research and
construction of this aircraft as well as surrounding landscape.
On July 20, 2000 I was
working on Little Patches when my wife came downstairs to tell me that I had a
phone call. Something happened that I never expected would, a phone call from
one of the crewman. Sam Harris had called me to see if he could be of any
assistance on my project. Sam informed me that he had been assigned as a radio
operator on Little Patches- July of 1944 through November 2, 1944.He also
explained about his last mission in Little Patches on November 2, 1944 which he
said he remembered as if it were yesterday. Sam explained that the target for
that mission was the Luna oil plant in Mersburg, Germany, fiercely defended by
flak and Bf-109s.he witnessed the B-17 named “Jubb Jubb” shot down. On the
way back home they were engulfed in swarms of Bf-109s, and as a result lost an
engine and half. They had become separated from the group and had to fly low as
a straggler to avoid being seen and shot down. Sam said they were over the Zider
Zee and heading toward Holland. Discovering a fighter strip on the east coast of
England, they decided to put her down. Little Patches ended up in a muddy farm
field just off the runway, with wheels down and empty tanks. He also told me that
it was home to the p-51 escorts that had earlier in the day, protected the bomb
group. Sam also explained that they had spent some time in the airplane before a
truck from the unit came and picked up the crew. Sam described it as the worst
mission he had ever been, on and it was a very tense day. At this time in our
conversation Sam also told me that he had a photo of little patches that he had
brought back from the war with him, and wanted to know if I would return it to
him if he let me barrow it for a while. I was overjoyed to actually see a real
photo of little patches and also Sams trust in my project and me. Sam sent the
photo and I had a copy made from it and returned it. This proved to be a very
detailed photo, which helped a lot to recreate Little Patches.
Another evening in September 2000 I received yet another personal phone call,
this time from George Fredrickson. George was the bombardier on little patches
also during 1944.George was so excited about my interest in Little Patches he
invited me to his ranch in Kansas, to show it to him when I was finished. I was
really honored and proud, that my new project had meant so much to the veterans
that were actually aboard Little Patches. I am planning this trip very soon, as
now completing my project and looking forward to meeting George in person.
George was also kind enough to send his only photo of her so I could get a copy
made for my research.
This is just a few of the many stories from people, veterans from other bomb
groups, as well as more from crewman and ground crewman who sent information and
encouragement for my project. Below I am listing a number of contacts I had
along with their help, which included:
Sam Harris:(radio operator/Little Patches) sent original photo/ talked on the
phone with Sam a few times as well.
George “Fred” Fredrickson:(bombardier/Little Patches) sent original
photo/invitation to meet him at his ranch in Kansas.
B.L. Deyerle: (bombardier/Little Patches) 1st mission was in Little Patches/sent
letter.
Evan Zillmer: (flight engineer-TT /Little Patches) flew single mission in
Patches/sent me a new undiscovered photo of Little Patches.
Sam Newton: (crewmember/Little Patches) called me to help with info on Little
Patches.
Ken Rowley (father-John Rowley/co-pilot/Little Patches) Ken sent me his dads
original photo of Little Patches for my research also helped with:
decals/info/documents/photos.
Harold “Hal” Johnson (co-pilot /Little Patches) email contact
Bernie Rogers: (ground crew/mechanic/Little Patches) contacted me to share info
on line shack /Little Patches, also sent 3 new undiscovered photos of Little
Patches and line shack.
Ken Ingignoli: (father LA Ingignoli/photographer 91stbg/401st bs) sent his
fathers small original photo to aid in my research. Had negative made and
returned photo to Ken.
Mike Banta: (b-17 web-ring/flew 1 mission in Patches) sent my project research,
to numerous veterans as well as helped with vital information on this B-17.
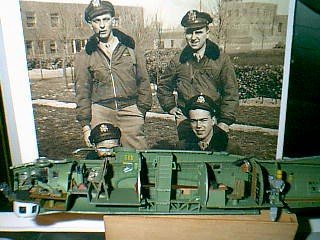
Leonard Contreras: (401st bg photographer) sent me 2 different original crew
photos, along with names and positions.
Dave Lomasney: (Father: T/Sgt James m. “Mack” Lomasney) sent me an original
copy from the negative of photo his dad took of Little Patches shortly after
arriving at Bassingbourn, England.
Phil Mack: (91ST Veteran/editor “Ragged Irregular” newsletter) Phil was also
a tremendous help in my project and even posted a few articles in The Ragged
Irregulars newsletters that go out to members of the 91st bg and others…this
proved vital and many contacts as well as information came from this.
Steve & Allison Penna: (tower museums curators/Bassingbourn, England) Steve
and allison both went out of their way to help my project along by sending
numerous overhead photos, of the base as well as farm machinery, hardstands, and
actual wartime photos.
Vincent a. Hemmings(member of Mike Banta’s web-ring) sent me photos from
museum in England, of farm machinery found around the Bassingbourn, England at
the time of the war. From these photos I scaled them down to 1/48 and made the
dump rake from scratch. Vincent, as a child lived 10 miles away from RAF
Bassingbourn , The 91st bg b-17’s flew directly over his house on the way to
their targets.
Ray Bowden: (91st B-17veteran/Author of “Plane Names And Fancy Noses”) Ray
sent me numerous photos of Little Patches, as well as info and photos of area
around airfield/farm machinery /detailed drawings. Ray was also kind enough to
send me a Limited Edition print #’d to 1000 of his original painting
“Mission 183: Berlin again”, as well as a personal autograph, and a one to
stick in my book.
Wally Foreman: (91ST B-17 veteran) sent 6 photos to aid in project as well as
personal letters.
Paul Chryst: (91ST B-17 veteran/bombardier) sent me copies from original photos
he took of Little Patches while stationed there during the war. Took the
original of patches sitting in hardstand while engines were running preparing
for mission, this is the photo that lead to the accuracy of my diorama.
I am sure I have missed a
few contacts and letters from others, but this is a complete list of major
assistance for my project. Without these people, this project would not have
been completed. The dedication and assistance from them in helping my project
research along was extremely rewarding and knowledgeable.
|
Click on images below to
see larger images |
 |
 |
Also received
were countless stories, letters and detailed drawings that aided as well. I have
kept in close contact with many of my new veteran friends, as well as having
compiled a vast amount of information, photos, and stories about this particular
B-17. I also have been invited to the 91st bomb group’s 60th reunion in
Tacoma, Washington in mid August/2002, to display my Little Patches project and
to meet a lot of the people who help me for the first time. This was a very
special invitation to me, to be included in a reunion held for veterans of the
91st bomb group and their families, and giving me a chance to meet the actual
crewman of this B-17. I found this to be a very special and meaningful project,
most of all learning that every aircraft has a story to tell, as well history
and detail that should be explored.
I have been building models since the age of eight and have learned a lot
of skills as well as scratch building items not found in 1/48 scale. This
project I wanted to tell the aircraft's story in my diorama and learn everything
I could about her, as well as the crews that flew missions in this B-17. This
proved to test every modeling skill I had acquired, and taught me to overcome
obstacles by research and a little bit of ingenuity.
About the kit
Kit: 1/48 Monogram/Revel B-17G & 1/48 Pro Modeler B-17G Flying Fortress
Kit #3600 & PM-85-5928
Price: $25.00/pm $60.00
Decals: Aeromaster (#48-415) Fortresses in the sky
Review & Photos by: Todd m Perry
Notes: Many 1/48 products used in construction of this aircraft/diorama: Eduard
(#48-207) B-17 F/G Interior set, Eduard (#48-208) B-17 F/G Exterior set, Eduard
(#48-209) B-17 F/G Armament set, Teknics (#48-01) WWII Ground Crew, Teknics
(#48-02) WWII American Bomber Crew, Jaguar (#48-004) U.S. Bomber Pilots WWII,
Aires (#48-56) .50 Waist Mounted Guns, Paragon (#48-103) B-17 Flaps, True
Details (#48-010) B-17 E-G Wheels, Verlinden (#48-1267) Ammo Belts, Verlinden
1/48 B-17 “Flying Fortress” update set, Tarmac (#48-031) 1/48 scale Horse
w/sled/barrels.
History:
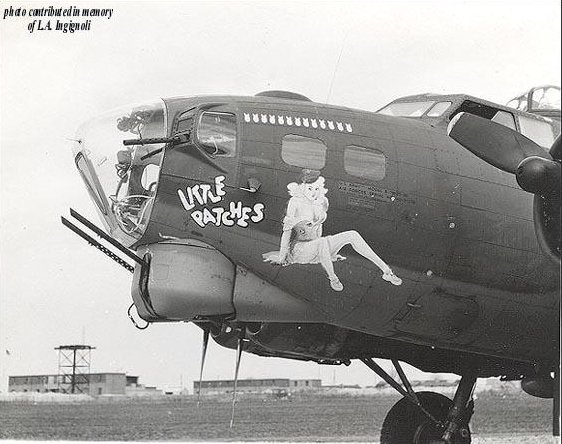
“Little Patches” (42-31678) B-17G-25-BO was delivered by Ferry
Command, to Bassingbourn in late January 1944.Originally assigned to the 324th
BS (id: DF-L), she received heavy flak damage two weeks later on a mission to
Frankfurt, Germany, was repaired with a lot of metal patches to the nose area,
and then was named “Little Patches” by Lt. William Major.
In early May 1944 she was
re-assigned to the 401st BS (id: LL-L), where she stayed the remainder of the
war. She finished her career with over 100 sorties flown, as well as safely
harbored 34 different crews and never lost a crewman. She also returned north of
Berlin, a target on eight previous missions, on May 8th 1945 and
collected RAF/POW’S and returned them home to England. Little Patches returned
to the United States on 6/11/45. Retired from service at Kingman, Arizona
12/7/45 for salvage, along side countless other B-17’s.
The Kit:
What can I say; Monogram’s B-17 kit is a classic! And is also the
only 1/48 scale B-17 you can get, most enjoyed by all builders of this kit. I
found however it does have weakness’ to detail as most kits do, and with a
little help from update sets and many hours of research, it can become a gem.
Monogram also has an excellent variety of B-17 variations to choose from, from
the early “f” to late “g”, standard tail or the Cheyenne tail turret, it
is by far probably one of the most optional kits you could ever build.2 kits
were used in the making of this diorama, the basic “G” model and the
Promodeler “G” to obtain the maximum detail and accuracy I could get in a
single subject, where I will describe more in depth below.
Construction:
The kit is compiled of a
number of products. Monograms B-17G Flying Fortress (kit #3600) was used as the
subject as well as the Promodeler version (kit #85-5928). I began with the
fuselage, adding extra detail as assembly progressed. Verlinden, Paragon,
Tarmac, Aeromaster decals, Tekniks, Jaguar, and Aires products were used
throughout this kit and diorama. They proved to be exceptional for providing the
high level of detail and accuracy I was after, building this kit. Areas that
were redone include tail gunner position, waist gunners, radio compartment, chin
turret, as well as the cockpit. Extra detail included seatbelts, fully detailed
guns with metal barrels, scratch assembled ball turret cradle, fully detailed
tail position, as well as all ammo belts, sights, scratch built waist windows,
and fully detailed top turret. Detail was also added to the cockpit area, where
photo etched brass parts were used, throttle handles, oxygen bottles, ammo
belts, and reworked pilot seats, complete with plywood backs and folders to hold
mission maps ect.
I will try my hardest to keep this as simple as possible without
writing a book, but I started this kit early in the winter of 1999, and finished
“Little Patches” on February 26 2002. My first goal was to find a subject
that I wanted to portray as a diorama when finished, and spent numerous hours
searching books, the web, and articles until I was flipping through the pages of
Squadron’s B-17 in action and on the back cover, was what I was looking for!
The kit itself I found to be extremely well done, but as stated earlier it had a
lot of places that needed a lot of attention. Such areas were the tail gunners
position, ball turret frame, cockpit, guns, and waist windows. First off was the
fuselage halves, and trust me there’s a lot of little stuff in them.
Modelmaster paint was used throughout this entire project, as I have found it
very easy to work with, as well as mix and airbrush. The entire fuselage was
painted olive/chrome where naturally found inside a B-17, as well as detail sets
added to help with missing or poorly done area’s in the aircraft.
|
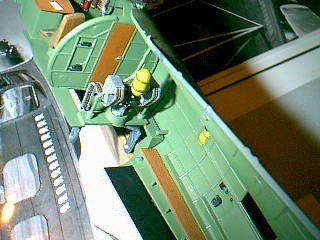
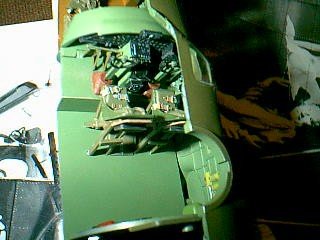
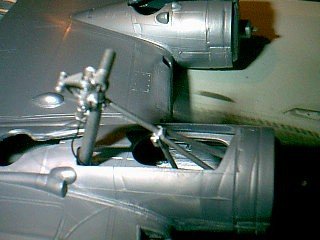
The tail
gunner’s position was completely reworked down to seat belts, new seat, blast
shield, and oxygen canisters and re-worked twin machine guns complete with
ammunition boxes and ammo belts. |
|
|
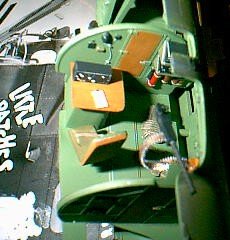
The next area was the radio operator where small
detail and research came in handy.
|
|
|
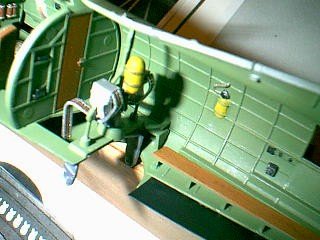
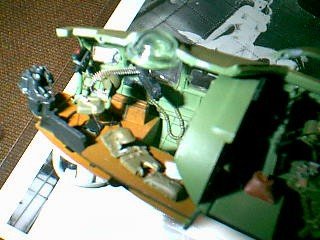
The next area I found that needed attention was
the ball turret position. I decided to re-work the original cradle supplied with
the kit, and stripped it and added ammo canisters, ammo chutes, new oxygen
system. This seemed to really bring this area to life and bring a more realistic
area to this position in plane. |
| Click
on images below to see larger images |
 |
 |
|
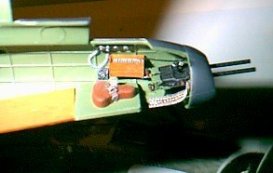
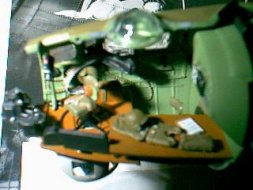
The cockpit was next and a lot of extra
detail went into getting this area just right. The seats were redone to include
the plywood back boards with map holders, seatbelts were added, as well as a
fully reworked bombardier and navigator station, complete with Norton bomb
sight, ammo chutes, belts, boxes.
| Front chin turret was also redone to include
outside inspection areas (2-small Plexiglas viewing areas when chin turret is
turned starboard) as well as ammo belts. This was the majority of the interior,
not going to list every little thing but you can get the idea of what I was
after as far as detail. Time to close it up and found that joining the fuselage
halves were a little tricky, but fit well at joints with little putty work
needed. |
|
I set the fuselage aside and focused on the wings and tail sections. I decided
that detail was my main goal here and carefully studied photo’s and
illustrations of the wings and tail surfaces. First thing I saw that needed
redone was the air/exhaust vent behind each engine on the top portion of each
wing. With a little help from my trusty Dremel tool, I thinned down each little
vent wall and opened it up, I do not recommend doing this unless you have a lot
of detail experience, as this is extremely hard and takes a lot of time and
patience without ruining your wings! After this step was complete, the turbo
chargers were removed so that the Verlinden resin ones could be added later on.
I also added screens to leading edge wing intakes, as well as cut out flap areas
for Paragon flap set, and other control surfaces on wings, tail section and
rudder. Next was to join wings/tail sections to the fuselage, which to my
surprise went extremely well expecting poor matches to fuselage and tail. With
little putty and some sanding, it was a beautiful fit!
Now was time to paint fuselage and wings which were airbrushed in standard olive
drab upper surfaces, neutral gray lower, and red tail, all of which I toned down
a little to represent a more weathered look of an aged B-17.also the chin turret
of “little patches” was another 2 shades lighter of which countless hours of
looking, resulted in no known reason for this other than probably a flack hit in
nose area and was repainted in a much lighter color of gray. Enamels were used
on entire plane, as I have not mastered the acrylic side yet and prefer enamels
to which there are pros and cons.
|
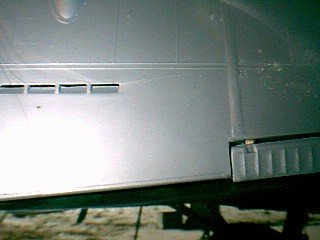
Time for decals, another problem I found out early is that there are no
perfectly accurate 1/48 decals done of this aircraft, many were made but few
were historically correct. A few examples of this are that many have the
“triangle A” (also be sure tail is #2316784,and not 231578.incorrect
historical data on the “578” version) tail decal as solid black with white
“A”, this is incorrect, the triangle is solid white with black “A”. |
| Click
on image below to see larger image |
 |
|
|
Also “Little
Patches” nose art has a very interesting history behind it as
well as a lot of incorrect decals made of this also! The correct version of the
decal with “little patches” in bubble letters is white letters with black
outline (not the yellow letters/never appeared with yellow letters!), also be
sure of when you are depicting her during her service, as early on in service
little patches displayed a blonde pinup girl (good up to 13 mission markers),
she then was in a maintenance fire and sent to sub depot for repairs and upon
returning Tony Starcer repainted her as a brunette, which stayed that way the
rest of her service!….anyway I started with the decals and finished up with
nose art and repainting the pin-up as accurate as possible over the Aeromaster
one, which worked very well in this case due to only hair and a few other things
that needed attention! |
|
Click on image below to
see larger image |
 |
|
Finishing “Little Patches”:
Now for the small finishing details. I started
from the back and worked forwards, adding a scratch built tail gunner’s sight
(ring/bead), metal gun barrels, and guns canvass rear liner. The waist windows
on this particular aircraft were the solid/not framed Plexiglas as well as the
“unstaggered” position of windows. I found that a round plastic cd storage
container works extremely well for windows in a B-17 (as you would buy them in
at a discount store ect.). Also remember that many B-17g’s did not have a
radio operators machine gun in top glass, such as the case with “Little
Patches”…. these were deleted early on in the war, due to radio operators
shooting the tails up and downing or disabling their own aircraft in some cases!
For this you have to borrow a radio operator’s glass from the Monogram B-17f
kit, or the 1/48 “Memphis Belle” also has this correct glass!
Ball turret is now reworked complete with seat, reworked metal guns ect. Also
top turret is reworked, assembled and given metal barrels/ammo belts. All glass
installed and used a metal-framed front windshield with light plastic glass,
(complete with p.e. metal windshield wipers) so I could display with port window
open to show cockpit details. At this time the chin turret was added along with
metal barrels/flash tubes, and cheek guns. The turbo chargers were painted and
put in proper location, as well as fully detailed radial engines with p.e.
wiring harness’s. I spent several nights weathering this bird and after I was
satisfied with paint, on with the chalks and buffers. These birds were extremely
dirty and one would have a hard time overdoing one of them, as oil leaks and
fires were common issues of B-17’s during the war. Next was adding the
antenna’s, landing gear (Verlinden pieces re-worked for proper ”unloaded”
height) as well as adding photo etched crew access door, rear door, brake lines,
True Details B-17 bulged wheels, as well as a lot of things I am forgetting to
fill in.
Exterior details are also
abundant and include opened wing vents, leading edge engine vent screens, hollow
metal machine gun barrels, ring and bead site for tail gunner position, fully
detailed engines with wiring harnesses, reworked landing gear to capture exact
“empty” load weight as well as brake lines and bulged tires. I removed the
de-icier boots, as they were removed often by ground crew to keep weight of the
aircraft as minimal as possible and left behind the natural aluminum finish on
leading edges of B-17.
All flight control surfaces were removed and reworked including addition of
flaps to the wings. Crew entry doors were removed and replaced with photo-etched
replacements. Paint included a vast array of Modelmaster enamel paints, which
were mixed to a weathered appearance and applied using an airbrush, internally
as well as the exterior camouflage scheme. New photo-etched metal windshield
frames were applied including metal windshield wipers. This also allowed the
opening of the port side pilot’s window to gain a more realistic setting.
Decals were applied and redone to provide the correct historical and actual
aircraft markings that I had researched; including the repainting of pin-up girl
on the nose.
Todd