|
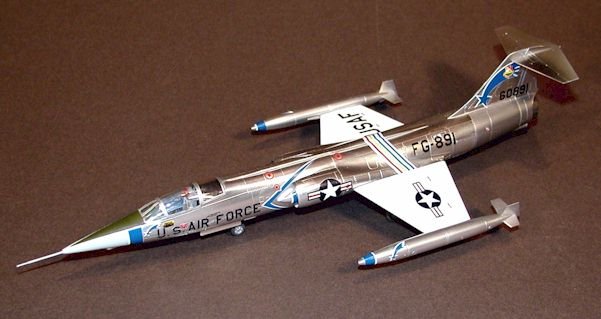
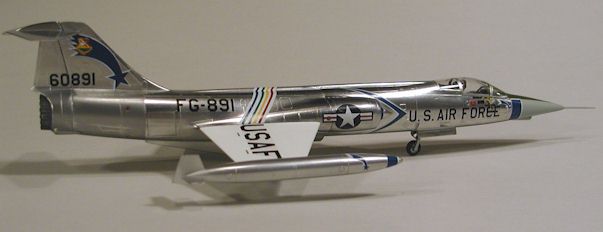
Missile with a Man in it...Lockheed F-104C in
shining metal
I don't remember exactly when or where I first
saw an F-104, but since that time long ago, I've carried a special fascination
for the gleaming silver Missile with a Man in it. Though I own many kits
of this radical looking aircraft, this is the first one that has actually been
completed. I came across the 1/72 Monogram kit several years ago when it was a
new release and, of course, had to add it to my collection. When I opened the
box I was pleasantly surprised to find a kit with nicely engraved panel lines
and no flash. The kit breakdown was very well thought out and somewhat simpler
than the 1/72 Hasegawa kits. The only area that was lacking was the cockpit. At
that time in my modelling life, I was becoming intrigued with bare metal
finishes and had been doing some experimenting with the available methods. I
chose this kit as a full build experiment due to the price being approximately
half of the Hasegawa kits - and my fear of ruining one of them in the process of
learning.
I had worked with both the Testors Model Master
metallizers and the SNJ metallizer system. I found that by combining the MM
paints with the SNJ polishing powder, I could get a more highly polished
aluminium appearance than using just one or the other. The other major discovery
was in the pre-paint plastic prep. This turned out to be the biggest factor in a
smooth, shiny final product. Early on I decided to build this model
out-of-the-box, otherwise I'd never get it finished!
The kit itself went together very nicely with
only minor seam clean-up required along the fuselage spine. The interior, as
mentioned above, has little detail, using decals for the instrument panel and
side consoles. The seat is basically the correct shape, but again lacking in
details. I decided to use the kit decals and interior parts as this was mostly
an exercise in natural metal finishes (NMF), plus the canopy is a one
piece unit so it would stay closed. The nose cone matched very well to the
fuselage contours and only minor sanding was required to get it right. The wings
were a perfect fit, matching up to the fuselage with no gaps or size (width ,
length, etc.) differences. The speed brake doors took a little dry fitting and
sanding, but fit very well after that. Per the instructions, the landing gear
had to be installed when the fuselage was assembled and I could see no easy way
around this. That complicated the polishing process later on and resulted in one
leg being broken off. I saved attaching the elevator until all painting,
polishing, etc. were complete.
Applying the NMF
Once the fuselage was together and the seams cleaned up (or so
I thought), I began the process of fine sanding and polishing the plastic. I use
a product call Meguiar's Mirror Glaze, which is used for polishing automotive
and motorcycle clear plastics. It come is a large bottle that has lasted me over
5 years. I also use it to polish the Lexan shields on my motorcycle helmets....
A small puddle is deposited on the plastic and buffed in using a piece of
flannel. For this I use automotive polishing clothes, but have also done just
fine with a piece of old flannel shirt. I also will use a Q-tip (cotton tipped
swab) to reach tight spots This is a tedious process, but the results are well
worth the effort. If done correctly, once the polish is washed off, the plastic
will shine. This is what you want if you're looking for the highly polished
aluminium finish. After all polishing is done, a good washing with soap and a
toothbrush helps get any leftovers out of the panel lines, and you're all set
for the application of a metallizer.
| I chose to mask off the painted anti-glare
panel after the metallizer. If you're going to use the SNJ
polishing powder, there is a tendency to rub some of this into the
pre-painted areas and then you'll have to repaint to get the proper
appearance. After masking the canopy, I sprayed the entire model
with Testors Buffing Aluminum metallizer. Being impatient, I only
waited about 15 minutes before I start the polishing process. The metallizer is initially prone to
collecting finger prints and is very difficult to effectively clean-up
once that's happened. The use of thin cotton gloves is recommended when
handling the kit at this point. |
|
I start the metallizer polishing process by going
over all of the painted surfaces with a fresh cotton ball. This will drastically
improve the sheen of the surface and also allow you to see any flaws that might
have been previously missed. At this point I also found that I hadn't done as
good a job on the top seam as I'd thought, and it had to be sanded and polished
again.
Next is the messy part. The SNJ polishing powder
is actually very finely ground aluminium - almost a dust - and gets all over if
you're not careful. I usually put on a shop apron before this step. Placing some
powder on a new cotton ball, I start at the front of the aircraft and work my
way around, polishing in a circular motion. Be aware that you'll be putting some
pressure on the kit during all three of the polishing steps. Be careful of any
joints that may be weak as you can easily cause these to come apart.
At this point you'll need to decide just how much
of a sheen you want and continue buffing with the cotton balls and SNJ powder
until that level is achieved. I went for quite a awhile on this kit as I've
always loved the look of the highly reflective aluminum on the F-104. Using the
SNJ powder seems to make the Testors metallizer much more resistant to finger
prints, though not totally immune..
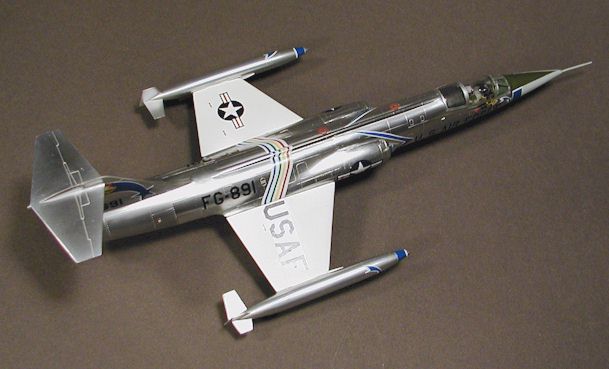
All looked pretty good. It was now time to paint
the wings white (these had not yet been attached). I hate painting anything
white because I still haven't come up with a method that will give consistently
good results. I primed the wings and then used Floquil Reefer white as it seems
to me give the best coverage. After the paint dried I buffed the surface with a
piece of white Scotch-Brite fine abrasive pad to smooth out the flat paint and
sprayed a coat of Future on them. At some point in the building process I
managed to snap off the wing tab that fits into the fuselage slot and this had
to be replace with a couple of pieces of thick wire. The wing and fuselage
mating surfaces were scraped of paint and joined with super glue.
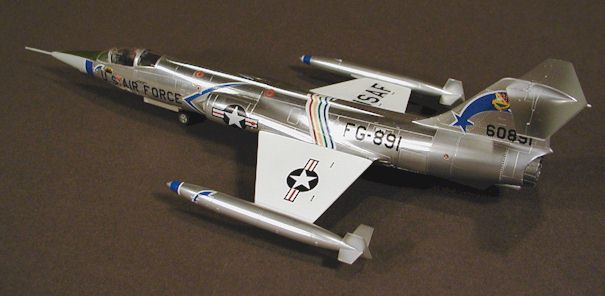
I masked the anti-glare panel using black 3M
brand graphics tape. This is fairly low tack to begin with, but I also stick it
to my arm a couple of times to reduce the adhesion a bit more before placing it
on the metallized surface. I also do a very light sanding of the metallized area
before painting, just to help the paint stick better. This area was sprayed with
Model Master medium green, per the kit instructions. Once the paint was surface
dry I carefully peeled off the masking tape and found a nice clean line, with no
loss of metallizer.
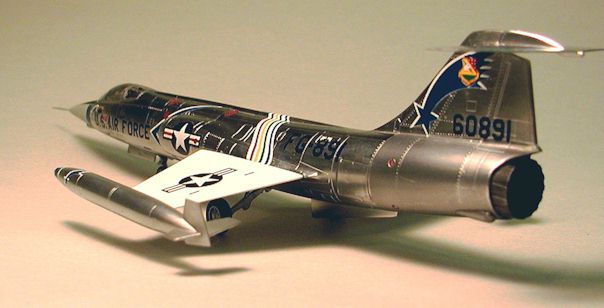
| As the panels on
the back of the F-104 are made up of different metals, I sprayed some MM Stainless
Steel and Titanium to simulate these. The panels were masked
with Post-it notes, sprayed and left to dry for a brief time. These
areas were then lightly buffed with a cotton ball, but no polishing
powder. |
Decalling
There are not many decal choices for this
kit, so I opted to use the kit-supplied sheet. These are Scale Master
decals and actually worked very well. I placed the decals directly on the
polished metallizer
and used Aeromaster and Micro Scale solvents. The only one that caused an
issue was the U.S. AIR FORCE decal for the left side. |
|
| This comes in
two pieces so that you can display the gun bay opened - which I didn't do.
I had trouble getting the upper and lower portions of the "S" to
line up and finally left it alone before I destroyed it. If you look
carefully on the photos you may se that it's a little crooked. Most of the
decals blended very well and had little carrier film to stand out against
the metal surface. |
The Finals
Once all of the decaling was done, all of the
remaining parts: wheels, pitot tube, elevator, etc. were attached with super
glue. There were a few small area where some fingerprinting was visible so I
again decided to experiment. First I wiped the area with some Polly
"S" plastic cleaner (the pink stuff) and then took another small piece
of the white Scotch-Brite pad that was used and worn a bit - and lightly buffed
over the area. Much to my surprise, these areas blended perfectly with the
surrounding surfaces and didn't do any damage to the decals. I dipped the canopy
in Future and let it dry over night. The framing was then masked and sprayed
with metallizer and buffed. No polishing powder was used this time.
No top coat was used as I wanted to keep the
polished look just that way it was.
I believe this kit is still available, and
I'd highly recommend it to anyone looking for a fairly simple Starfighter kit. I
had lots of fun (and a few frustrations) building it and also learned a lot
along the way.
Mike
|
|