|
During WW2,
the RAF took delivery of about 240 P47 Razorbacks (Thunderbolt I)& about 600
bubble-tops (Thunderbolt II). Apart
from an OTU in Egypt, all that saw action were based in the India/Burma theatre
as fighter-bombers replacing the weary Hurricane in this role.
Many squadrons so re-equipped had been expecting Spitfires & were a
little miffed to get this monster. More
seriously, there were several accidents when RAF pilots failed to master at low
level the incredible diving speed of the P47.
Few Thunderbolts survived in the RAF beyond VE Day, the last disappearing
in 1946.
Construction.
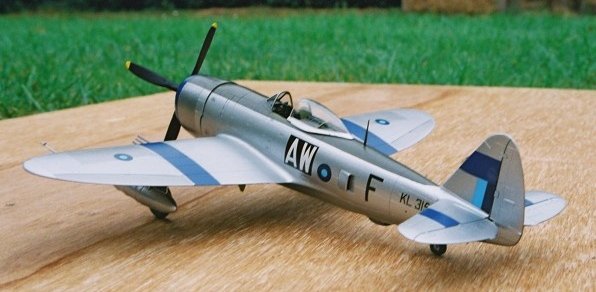
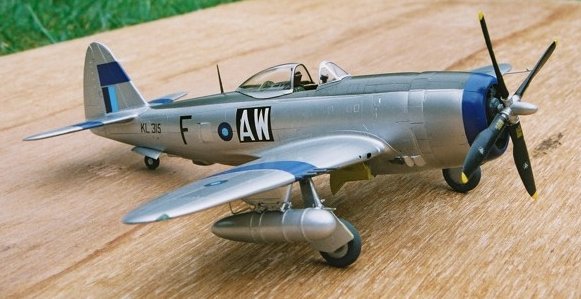
This machine
KL315 is actually a D30. This
variant is currently OOP with Hasegawa so I used their D25 as a starting
point. The main visual difference
between the two versions is the dive brakes under each wing of the D30, just aft
of the wheel wells. In their D30
kit, Hasegawa provide these as etched parts.
I had a D30 on my display shelf so, taking it down, I used a thin sheet
of paper & a pencil to take a “rubbing” of the parts as they were
installed. I then cut the shapes
from the paper, transferred them to thin plasticard, cut around them &
presto….. a pair of dive breaks!
(see photo directly below)
A photo of
this machine (which served with 34 squadron then 146 squadron which then became
42 squadron) in Geoff Thomas’ book on RAF P47’s shows that it did not have
the dorsal fillet which IS included in the D25 kit & which was standard on
the D40 & “retrofitted” to many machines from earlier blocks.
Propeller type is not evident but the Curtis Electric was the
standard fit for D30’s (for maintenance purposes, the RAF at least considered
props fully interchangeable!).
I used the Black
Box cockpit which went together well although I found the resin they use to
be a little more brittle than I had previously encountered.
Add to this the rather “inconvenient” way in which the parts are
attached to their casting blocks & I ended up snapping both side walls
during the sanding process. They
went back together OK & it was probably my own fault.
All interior parts were sprayed Xtracolour “US Interior
Green”, which may or may not be correct but it works for me.
I also used
the Aires wheel bays. A vast
amount of resin casting block has to be removed from these pieces & still
the fit is not good; I had to remove plastic from the wing root fillet on each
fuselage half leaving the kit parts extremely thin in these areas &
predictably, one side split. A
little liquid polly & wet & dry soon fixed it.
There was still a larger gap at the wing/fuselage join than I have
previously encountered with Hasegawa P47’s.
Plasticard was used again to fill the gap as much as was required with a
strip of tape holding the dihedral in place overnight whilst the glue dried.
After sanding, the panel lines in this area were rescribed, as were the
two small vents on either side of the lower fuselage just behind the wing.
The rest of
the kit was assembled as per the instructions.
Hasegawa seem to have a tool problem with their P47 cowling where
a large “dent” is evident just behind the ring & to the right of the
centre line. A large piece of flash
is also evident here. Careful
trimming & filling cure the problem but watch out for it.
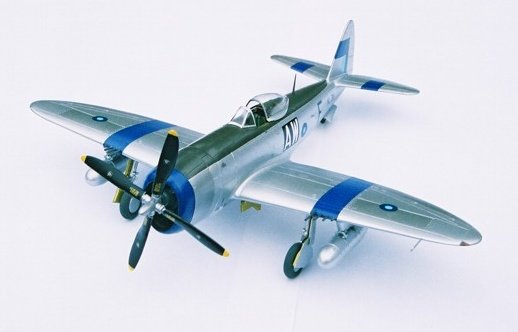
Painting & Decaling
Most
Thunderbolt I’s in RAF service in the far east were painted US equivalents of
RAF dark green/dark earth/medium sea grey.
The same scheme was applied to early Thunderbolt II’s but later
deliveries were natural metal & I believe that some “II’s” were
subsequently stripped back to this finish.
On NMF machines, “Roundel blue” replaced the white i/d bands of
camouflaged machines (some sources state “identification blue” & I am
not sure if this is a different name or different shade).
Anyway, Xtracolour “roundel blue” was sprayed on the cowling
ring, wing & tail plane upper & lower surfaces & fin.
These were then masked of with appropriate scaled widths of tape (24”
on wing, 18” on tailplane & fin) & olive drab was sprayed on the upper
fuselage decking for the anti-glare panel which was also masked off.
Wheel bays & doors were sprayed Xtracolour “zinc
chromate”. Now the entire model
was sprayed gloss black enamel (I “don’t do” acrylics). I then sprayed a thin coat of white aluminium Alclad II
using my Badger 200. Whoops,
the result looked as if I’d sprayed it with honey & then rolled it in the
kid’s sandpit! With hindsight, I
realised that I had sprayed too fine a coat from too great a distance, allowing
this very quick drying medium to “dry” in mid-air.
Back to sanding & another coat of gloss black followed with Alclad.
This time, I used my Aztec 470, which allows greater control of
the speed & density of the coat, & a better result was achieved.
Dark aluminium was sprayed on a few panels for variety.
Decals came
from Aeromaster sheet 48-302. I
used a few stencils from the kit decals but not all seem to have been applied to
RAF machines.
Final
details.
The solid
wheel hubs were used from the two styles the kit provides.
The Aires set provides undercarriage doors but I could see little
improvement over the kit parts so the latter were used.
The photo in
Geoff Thomas’ book shows this machine fitted with the impregnated paper type
tanks so these were added from the spares box (Academy I think); plumbing
was added with fuse wire using holes I had drilled & a drawing in
“Republic P47 Thunderbolt” by Martin Velek & Valerij Roman, published by
MBI as a reference. Finally, the
whole model was sprayed with Humbrol gloss varnish to seal everything
down. Humbrol steel
“metalcoat” was used for the small exhausts, the exposed dome housing of the
supercharger & the gun barrels which had been (carefully!) drilled out.
Conclusion
Both the Hasegawa
& Academy P47’s have their advocates & having built both,
either provides a good model “OOB” (more recently, Tamiya have
announced a Razorback version). Fit
of the Academy offering is perhaps better (especially at the
wing/fuselage join) but I still prefer the Hasegawa version.
Without the resin enhancements, this kit can be built over a few days
& enhance any display wanting a good representation of this important
fighter. The RAF NMF with it’s
attractive blue I/d bands provides an interesting & neglected scheme. The Aeromaster sheet I used is quite old & OOP, hopefully
it will be reissued by them or maybe Eagle Strike? How about a sheet for the camouflaged Thunderbolt I??
Graham
|
Click on images below to
see larger images |
 |
 |
|