|
After a 20
year break from building models as a kid, I got back into it in 2002 and the
Boomerang is my eleventh kit this year. However,
I am still very much near the bottom of a steep learning curve!
It
was my first ‘limited run’ kit, which I sourced over the Net via Magpie
Models in South Australia, after deciding to now focus on Australian WW2
aircraft.
The
kit was manufactured by Tasman Models in New Zealand and was a considerable
challenge compared to the first ten I made, which were all mainstream kits (Hobbycraft,
Monogram, Revell, Fujimi etc).
These
limited run kits require much more sanding to ensure a decent fit, including
removal of thick plastic channels on the inside of many parts.
I purchased a cheap Dremel-type tool for this, which was a sanity saver.
| I
had to come to grips with a large number of pewter parts requiring
Super-gluing and the need to build the cockpit tub from scratch, which I
did with thin brass rod.
Basic
assembly took 3-4 times longer than previous kits, particularly building
the cockpit. The seat belt
was built from plastic card. I
elected not to open the wheel wells fully (as they are in the real plane),
but did some additional detailing with plastic card and stretched sprue.
|
| Click
on image below to see larger image |
 |
|
These
kits require continual dry-fitting and re-sanding before committing anything to
glue and I was much more vigilant about this than on previous kits.
This paid off in the end and the only major problem was where the wings
join the fuselage. Plenty of Revell
putty was used to fill the gap and remove a significant step.
|
Click
on images below to see larger images |
 |
 |
I
find undercoating the model in a light grey really helps reveal bad joins and
this kit required numerous re-sandings to make it passable in this respect.
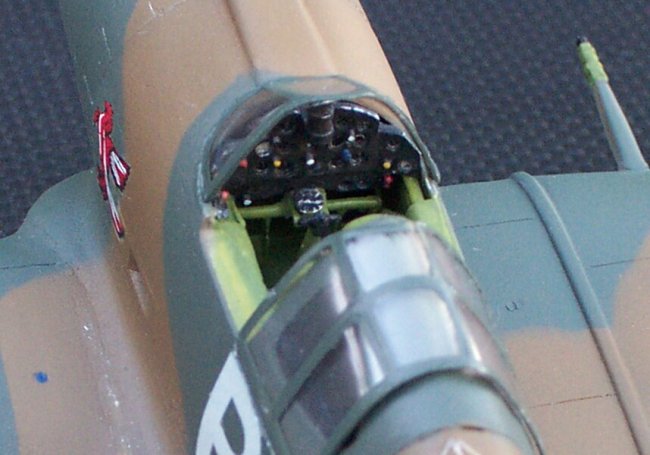
Fitting
the pewter instrument panel and rudder pedals was problematic because the
cockpit tub I built was a little too wide.
I had to cut and re-glue the pedal assembly to make it narrow enough to
fit in. I recommend putting the
instrument panel and pedals in after assembly/painting as it can easily be
knocked out (as I did).
The
instructions are all written (no assembly diagrams) but are very easy to follow.
Numerous detailed pictures of the real aircraft are provided and you can
go to town on detailing from these if you wish.
Take
particular note of the instructions for cutting the Vac-formed canopy.
This was the first one I had ever cut and it went well.
Use a new blade and do repeated passes until you finally break through.
The first cut should be a very light scoring only.
I even cut the main canopy in two so I could display it in the open
position.
Painting
was performed with an Aztec airbrush, which I purchased along with a compressor
after deciding to graduate from brushes (no Christmas presents for me this
year!). I used Model Master acrylic
pouch paints, light blue for the underside, earth brown and dark green for the
upper camouflage and interior green for the cockpit and wheel wells.
Tamyia
clear gloss was applied prior to the decals.
Here I struck problems. The
decals come as a single sheet and need to be carefully cut around as close to
the decal as possible to minimise the border.
This was OK, but decal adherence was very poor and I had to brush on more
gloss to make some stick. Even
using Microsol, they did not bed down into panel lines at all.
Minimal
weathering was performed on this model. Prior
to painting the upper surface, I sprayed some Tamyia dull aluminium on the wing
roots and some leading edges. I
pre-sprayed some panel lines in black, which shows through the camouflage
colours. Sanding exposed the aluminium to simulate scratches.
I sprayed the centre of some upper panels in a slightly lighter shade of
the green and brown to simulate minor fading.
Exhaust
and gun smoke stains were sprayed with a mixture of black and brown.
Despite
the instructions recommending wood glue for the canopy, I needed a little
plastic glue to make the front windshield stick.
Gaps were then filled with woodglue (it dries clear) and the join touched
up by brush.
|
Before
applying the canopy, the model was coated in Gunze flat clear.
Make sure you thin this stuff at least 50:50 or you will end up
with small white flecks all through your nice paint job.
After
this final coat, there was considerable silvering around most decals that
I carefully painted over with green or brown.
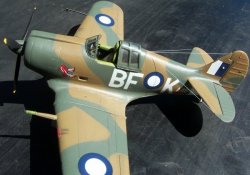
Radio wires were added with stretched sprue to finish and the
result was a fairly fresh looking Boomerang.
|
| Click
on image below to see larger image |
 |
|
This
was a most satisfying kit to build and though it got me well out of my modelling
comfort zone, I am very pleased with the result.
In hindsight, it may have been worth discarding the kit decals and buying
some replacements.
David
|