|
Well
here it is my very first model. Well
other than a couple of models I did when I was about 10 years old that is.
I came across A.R.C. back in June of last year.
I quickly remembered how much I loved building models when I was younger
even though I had only done a couple. Since
then I’ve been back to this site almost daily drooling over some the amazing
models put out by some of the other contributors on the site.
I finally broke down in November and bought myself my first kit.
I have always loved the older pre ww2 planes and when I saw this kit I
just knew I had to have it. I was a
little bit shy about buying a kit with rigging for my first model but I decided
that because most of the kits that I wanted to do where bi-planes that I might
as well just jump in and start learning how to deal with antennas , wires and
such. I had an airbrush that my
wife had bought me last Christmas but I had never really used one for modeling.
So with not much experience and a lot of help from A.R.C.’s tools n’
tips page I set out to build this beast. Let’s
just say it’s been a learning experience.
About
the kit. Well I don’t really have much to compare against but I’ll
tell you what I can. Over all I
don’t think it was that difficult of a build.
The hardest part for me was trying to plan out what to do and when but
with a little patience I managed to get through.
The
model has raised panel lines and rivets which made sanding pretty interesting.
I’m not sure if that is a common thing for this scale of model but
I’ve decided that I could really do with out them.
Over all the entire model seemed to fit together pretty well
but there were a couple of areas on the plane that I had complaints about.
First
off would be the fit of the cockpit. I
test fitted most parts before putting them together but, Murphy’s law of
course, I didn’t with the cock pit tub. I glued it into place against the pins
the fist time and “ouch”. The
cock pit was way off center and I ended up with at least a ¼ inch gap between
the tub and the fuselage. I
de-bonded the glued and tried again numerous times to make it fit properly but
with no luck. It was almost as if
the tub was out of another kit. The
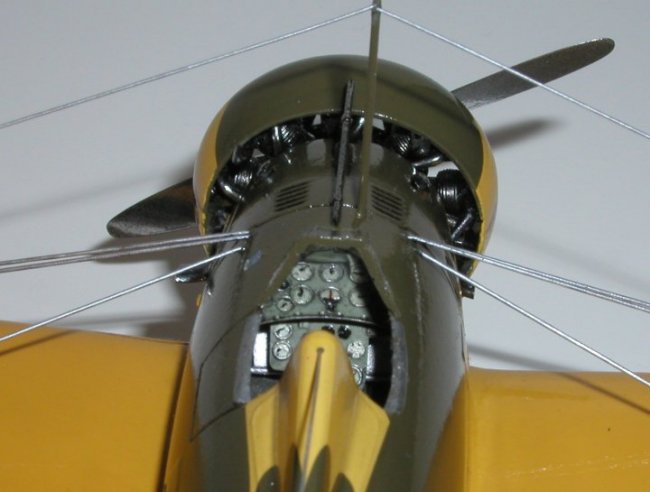
second area I had problems with was the engine cowl.
Again another time I learned the hard way to test fit my parts.
When I went to put the cowl together over the engine I ended up with yet
another ¼ gap. I nearly cried!
I took the masking off the engine and sanded it down all the way
around until the cowl fit properly. I
re-masked the engine and wella! I
used window shrink wrap, the kind for winterizing you house, to mask off the
engine and simply took a hair drier to it to make the wrap fit snugly.
After I just cut out the glue points where needed.
I’m really proud of myself for thinking of this because it worked
great!
|
Click on
images below to see larger images
|

|

|
The
engine was painted with Alclad II stainless steel (I love this stuff!), gloss
coated and weathered a bit with oils. The
Alclad II stainless was very forgiving but the Chrome that was used on the prop
was a different story. For all you
new guys believe the tips that every one gives you about having a perfectly
smooth black enamel base coat.
|
Click on
images below to see larger images
|

|

|
Humbrol
enamel paints (#’s 154 and 155 plus gloss white for scale effect) where used
for the rest of the plane. A
Humbrol gloss coat was applied before and after decaling.
Man, did the gloss coat ever darken the shades of my paint.
You’ll probably notice the difference in shades between the decals and
the wings. When I tested the paint
out it matched the decals perfectly but the gloss coat darkened it considerably.
I’ll have to keep that in mind for next time.
The decals seemed a bit thick to me.
I had some problems getting them to wrap around the landing gear and the
top of the fuselage by the cockpit. I
ended up with some pretty noticeable wrinkles in both areas.
To fix this I simply gloss coated every thing then I sanded out all the
areas where there were wrinkles and then touched them up with paint.
The landing gear and the cowl decals pretty much had to be completely
repainted by hand. I was using
micro scales “micro set” and “micro sol” for the decals but I think that
a stronger solvent would have helped out a lot.
For the rigging and antennas I started off using 0.010 and 0.015 styrene
round rod. After breaking about a
dozen pieces I quickly switched to “knitting elastic” that I raided from my
wife’s sewing kit. This stuff was
so much nicer and it was easy to get it stretched and to glue as well. Normally
I prefer flat finishes but for some reason I thought a gloss coat would look
good on this particular plane. I
later regretted this and I wish I would have used a satin finish.
At times it seemed like for every one thing that I did right two things
went wrong but over all I don’t
think it turned out to bad for my first kit.
I’m
starting an IAF F-16 D Viper right now. Hopefully
I’ll have a little better luck on that one.
I
want to thank every one who has contributed to the “Tools n’ Tips” section
here at A.R.C. The articles
in this section make a world of difference to the newer modelers like myself.
Also I would like to thank to all of you guys on the discussion board.
It seemed that no matter how silly the question I all ways received a
response for someone more than willing to help me out.
You guys are great!
Dean
|