| The
flying Tun
|
| After World War II not only
the Americans and Russians profitted by the advanced German aviation
researches but also the Swedish. The Swedish aircraft industry used
this technology in
their postwar projects. The test results for the new swept wing concepts
that were developed on German drawing boards, not only arrived in the USA,
but also ... a little bit "more unofficially" ... via
Switzerland in Sweden. Those concepts become particularly clear in the
Saab's Tunnan project as it was very similar to the drawing board projects
such as the German TA 183 Huckebein. The first Saab J-29 prototype made
its maiden flight on September 1st 1948. By 1961, thirty aircraft of the
final version J-29F were sold to Austria. A detailed description can be
seen at: http://www.canit.se/~griffon/aviation/text/29tunnan.htm |
Click on
image below to see larger image
|

|
|
The kit and the decals
If you want a model of the
Tunnan you can choose between two kits: the Matchbox issue, later re-released
by Revell of Germany or the Heller kit, both in 1/72 scale. By my experience
the better one is the detailed Heller Tunnan but it is also the rarer one ...
so I had to be satisfied with the Matchbox kit. This one presents itself in
the expected "usual" Matchbox quality. Not that many parts, some are
partly engraved and some with raised lines with a more or less imaginary
amount of detail. But nevertheless the shape is generally good and the
comparison with 1/72 scale drawings reveals a good scale. For the markings of
my Tunnan, I opted for a decalsheet of IPMS Austria with Austrian markings for
a Tunnan, Cessna L-19e, Pilatus PC-7, Agusta Bell AB-47GS, Bell H-13H, YAK-11,
Fouga Magister and Alouette III.
| Starting
construction |
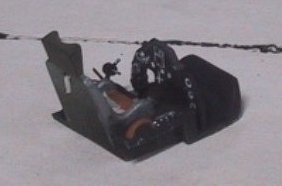
| And once again
the cockpit is the starting point. Out of the box you must get along with
a piece of the cockpit floor inclusive grandpa's wing chair, a control
stick, an instrument panel and a clone figure. I added some seatbelts and
a few details to the side consoles. The panel shows some raised details
which were highlighted by painting and dry-brushing. This time I omitted
the pilot -don't ask why, just look at my hawker Sea Hawk ;-). The
gun-barrels and small air intakes were drilled out. Before I glued the
fuselage halves together I installed the finished cockpit. |
|
| Some
weight was placed behind the cockpit ( see also paragraph "All the
small things"). |
| Then the
insides of both fuselage halves were painted completely black, with the
cockpit area somewhat lightened ... thus the unwanted discoveries of light
are prevented inside the Tunnan through the air intake and exhaust areas.
The exhaust piece was also drilled out, so you won't be looking at a
"wall". The air intake ring required putty to join the fuselage
smoothly without a step. The wings are the parts which have raised details
and the complete fuselage was engraved, or should I say chiseled ... but
we know that when we buy Matchbox oldies, don't we? So I engraved the
wings before I glued them to the fuselage. Now the already masked canopy
was glued in place and the Tunnan was ready for it’s paint job. |
Click on
image below to see larger image
|
 |
|
Painting and markings
| The
IPMS decal sheet offers markings for two different Austrian squadrons: the
2nd squadron fighter bomber wing from Graz Thalerhof of 1969 and the 1st
squadron from Linz Hoersching of 1962. With its bright orange contrast
surfaces the first mentioned is the more attractive, but also the more
complicated when looking at the details. The text of the decal set points
out that these aircraft flew with an additional recon housing, installed
in the forward, left side of the fuselage. Unfortunately I could'nt find
the correct information as to whether this equipment was fixed or if it
was removed from time to time. |
| Since I wasn't sure about this and as I
hadn't sufficient documents to scratch build the recon housing, I had to
fall back on the markings of the the 1st squadron which is a completely
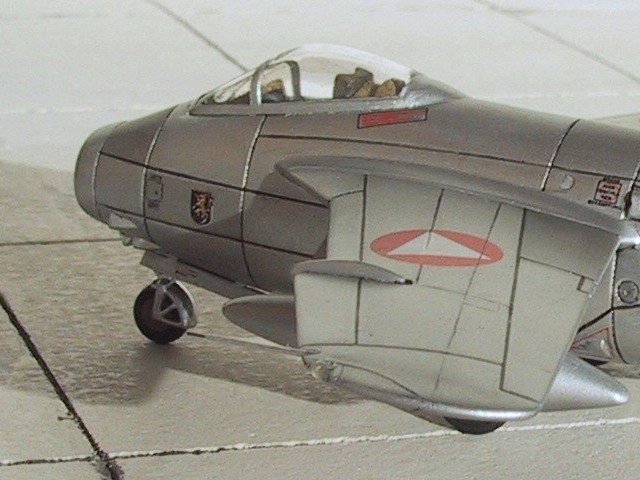
natural metal F-29F. However, the study of my
available reference pictures showed me that it wouldn't be sufficient to
give the plane a uniformed or consistent metal coat because the outside
appearance is characterized by the different shades of individual panels,
which nearly goes for all natural metal airplanes. Therefore I marked the
different shadings in my scale drawings and airbrushed the least
forthcoming metal tone first. After the painted areas were masked I went
for the second frequent tone (if you look carefully you'll make out three
different metal tones), and after that was masked the whole plane was
painted with silver Humbrol #11. |
Click on
image below to see larger image
|
 |
|
| Now
I sprayed a coat of "Erdal Glänzer" to offer the decals an
optimal surface. I did well to
follow the
recommendations and instructions becoming familiar with the special
characteristics of these decals, trying some of the "not to be
used" ones first. For example, these decals needed much longer to
separate from the transfer-paper than all the decals I had worked with
before. If you are too impatient trying to push the decals from the paper
, you'll soon have three or more pieces of the decal. Also, as the decals
are very thin, you should also be carefull while employing softeners or
vinegar-water. But finally I succeeded and all decals were where they had
to be. Again they were sealed with "Erdal Glänzer". Now I
washed the model with diluted black oil paint. This is the first time I
washed over the decals. Considering my fears not to bungle the whole model
by rubbing off the decals during the washing, I was pleasantly surprised
when nothing like that happened ... it just worked well for the first time
(modeling itself is an unending improvement, isn't it?). A coat of Humbrol
clear lacquer brought the paint job to an end. |
Click on
image below to see larger image
|
 |
|
All the small things
When everything was completely
dry I began glueing the remaining parts in place. First was the landing gear
which has some brake hoses according to my reference pictures. Then the other
parts, like landing gear doors, auxiliary tanks and the landing light section
positioned before the nose gear. Then I turned to the two pitot tubes. The
parts provided by the kit looked rather like walking-sticks fitting close to
the clone of a pilot, so I replaced them using the same method as on my Hawker
Sea Hawk. Finally I glued the antenna on the fuselage and filled the cut out
for the clearance lights with gloss clear lacquer. After putting the Tunnan on
the landing gear for the first time, I unfortaintly found the Tun was tail
heavy sitting on it’s aft section .... despite adding weight?! So, I added
more weight by painting a small ball of lead with black paint and then
positioned it straight through the air intake before the cockpit. This
corrected the problem. Whether the Tunnan would have stood on its three legs
if I hadn't used any weight ... I don’t know ... we'll see when I’ve
finished my second kit in Swedish markings.
Conclusion
When I started this project,
the Matchbox kit was ... besides the rarer Heller issue ... the only game in
town to build a tolerably correct 1/72 copy of a Saab J-29F. But Matchbox will
always be Matchbox, and if someone today is interested in this early jet, one
should ask for the recently announced limited edition IPMS-Austria resin kit.
Naturally this one won't be comparable concerning the price: approx. 30 EUR,
due to it’s far better detailing of photo etched parts and correct
engravings.
Special thanks to R L Donaldson
who helped me with this translation (original German article can be seen at www.modellversium.de
in the jet-gallery).
Text is from myself and photos
by Deun Yu. Thank you again!
Bernd
|
|