|
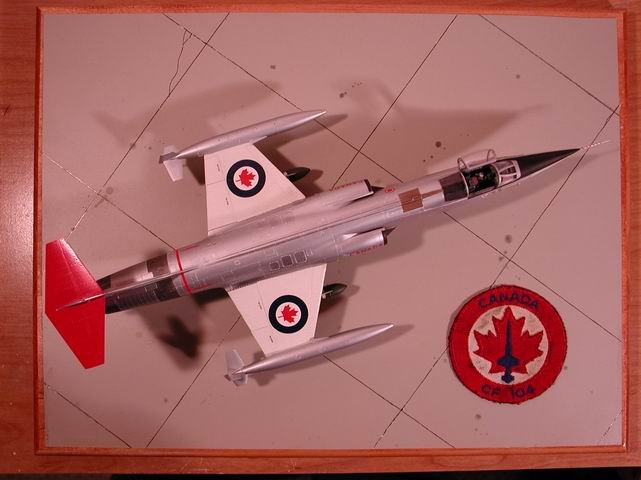
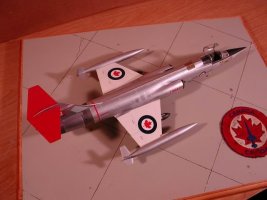
This is Hasegawa's excellent
F-104J kit built as a CF-104 as it appeared at C.F.B. Cold Lake in the late
1970's while serving with 417 Squadron. I presented it to my father as a
Christmas gift as he has 13 years of experience as an Airframe Technician on the
104. Needless to say, reference was never more than a phone call way.
The model includes extras in the
form of a Black Box cockpit, the Cutting Edge F-104 update set, and Belcher Bits
decals. I also robbed an old Esci F-104G for the centerline practice bomb
dispenser. I filled in the openings of the Esci offering and reshaped the nose.
I tried t0 rescribe the doors after everything was filled and sanded. I didn't
quite get a circular shape - the bottom has a bit of a "wave" to it. I
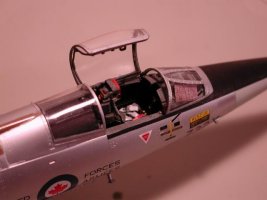
used the Black Box F-104J cockpit and this was my first experience with a resin
cockpit. Although the detail is nice, I wouldn't use it again. The seat if
beautiful, but the instrument panel is too high and I had to split it half way
and overlap it when it came time to install it (after it was all nicely painted,
of course). The cockpit coaming under the windscreen is also very large and I
had to shave quite a bit off the bottom and sides to get the windscreen to lie
where it should, losing a lot of the nice detail in the process. I didn't sand
enough off the sides and this spread the fuselage a bit - more later. Sanding
the bottom of the pit was easy - sand until the floor is gone as the F-104
doesn't have a cockpit floor. The pilot has two channels that run from the front
of the seat to the rudder panels. If the pilot ended up in a situation where he
had to get out of the airplane in a hurry (and a lot of them did) the seat had
two cables that ran to special stirrups that were on the back of his boots.
These cables pulled his feet back to the front of the seat and ensured that his
feet left the airplane when he did.
The kit itself is beautifully
molded. The detail on top of the wings is overdone, it should be smooth but has
a large number of rivets. If it really bothers you it's easily filled in. I used
very little filler - just a dab around the intakes and some around the nose
landing gear insert. As I mentioned I left the cockpit tub a tad too wide and
this left me with a bit of a gap around the insert piece for the nose gear. Not
a big deal, aside from all the vent detail I had to carefully fill and sand
around to prevent it from becoming dust. I can take any nice fitting kit and
find a way to add filler.....
|
Click on
images below to see larger images
|
|

|
|
|
The Cutting Edge set is nice and
includes some neat bits for various eras of the CF-104. I used the under wing
and centerline pylons from this set as well as the associated sway braces.
Cutting Edge also provides coloured resin for the various navigation and
formation lights scattered around the fuselage. I double checked a real airframe
(104763 at the Reynold's Museum in Wetaskwin, Alberta) and found the Cutting
Edge instructions were a bit off as far as what colour light goes where. My
memory is a bit fuzzy on this but I believe I ran out of red and that the green
lights are supplied as more of a dark blue. Not a big deal as it's tough to make
out the colour on the finished model. I also used the canopy interior framing,
not that this couldn't be made just as easy from bits of rod and sheet.
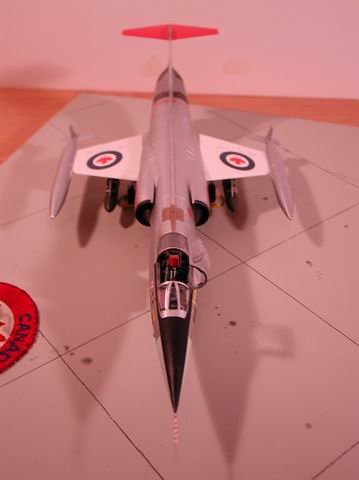
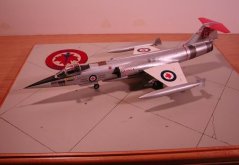
There has been much discussion on
ARC and Hyperscale with regards to the flap position on the F-104, as Hasegawa
gives you separate control surfaces to mount how you want. This is direct from
the ex-rigger himself - the flaps where left up and the speedbrakes left closed
"so we had fewer things to hit our heads on while crawling around the
airplane". As well, it ensured that start up checks always started from the
same point and nothing got missed. "Speed brakes open, speed brakes closed.
Flaps down, flaps up, flaps to take off." Remember this was the procedure
for the CAF, and not necessarily how other air forces did it. So on my model the
flaps are up, the speed brakes are closed.
I armed the model with the 19
shot rocket pods from a Hasegawa weapons set and the previously mention practice
bomb dispenser. The rocket pods are a little different at the rear end than the
photos I had but honestly, would you have known if I hadn't told you?
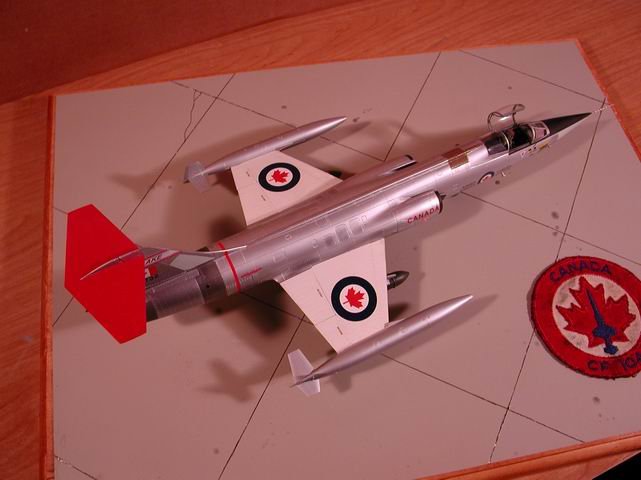
The model was finished with Model
Master Metalizers. I tried masking off various panels around the tail area with
wet newspaper and sprayed on different shades to get the effect of different
materials, with somewhat varied results. I didnt't seal the Metalizer, as I find
the sealer tends to negate the "real metal" look, so that meant
handling the model as little as possible. Despite my best efforts I ended up
with a nice faded look in area - too bad I was going for the solid colour look!
The fibreglass areas behind the cockpit were done with MM Platinum mist - a nice
match to my eye.
There is always a lot of
discussion about the colour of the underside of the wings and the radome, which
is Grey 501-109. IPMS Buzz Buerling has the GP-12c colour guide and gives the
colour as"about a 50/50 mix of RAF 'Sky' & FS35237". After
scouring through countless Dakota, Tracker and Sea King decal instructions and
of course Patrick Martin's book for colour suggestions, I tried Humbrol #23 Duck
Egg Blue and Model Master FS36492 Light Grey out of the bottle. To me, the Model
Master was a little less on the green side, perhaps giving the impression of
being a little faded so that's what I used.
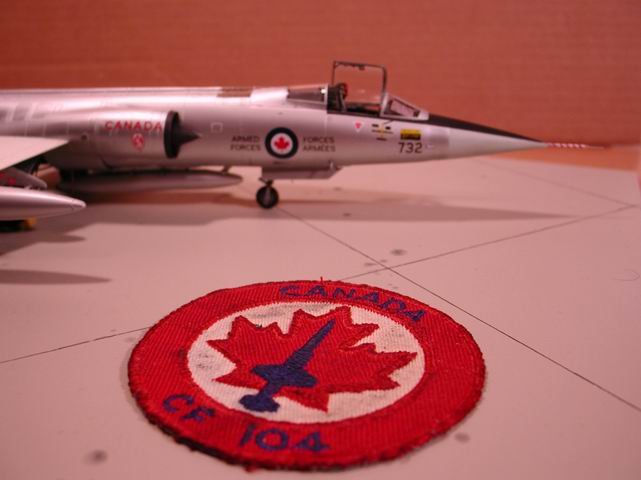
The decals are Belcher Bits BD-6
for the CF-104 and go on beautifully. I applied them directly on the Metalizer
using just a bit of Micro-sol to get them to snuggle into the detail. The wings
fit perfectly so I painted these gloss white, decaled, sealed them with Polly-S
Semi Gloss to give them the proper sheen and then attached them at the very end.
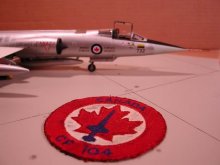
The base is a sheet of cardboard
attached to a cheap wooden plaque that I stained. I had airbrushed the cardboard
using various shades of grey, brown and tan giving a nice concrete effect.
Unfortunately my "one final misting" of grey went on too heavy and the
base came out a mono-grey colour. By this time it was late on the 23rd
of December and I didn't have time to start over. The lines were penciled in
with a straight edge and then darkened freehand with a black marker following
the pencil lines as a guide. Going freehand gives it just enough variation to
make it look real. The patch is from Dad's old flying jacket and that's real
CF-104 grease on it. If you try you can still catch a whiff of JP-4.
The final touches were a pair of
chocks for the main wheels and a map in the cockpit from a Verlinden map set.
See, if you try hard enough you can find a use for armour accessories.
All in all, this is a wonderful
kit that I would recommend to anyone. The model brought back a lot of great
memories for Dad and myself. If I try hard enough, I can still hear the howl of
the J-79'sspooling up on a cold winter's night.....
Sean
|
Click on
images below to see larger images
|
|
|
|

|
|