|
Well,
following the positive response I had with my F-15 on ARC, I figured it was
about time I contributed something else! I thought I might share with you
an in depth look at Italeri’s 1/48 F-22 Raptor (with a twist…plus, it fits
in well with "Silly Week"). I tend to go on a bit, but hopefully
y’all can get some useful information from my review. If nothing else, enjoy
the photos!!
Unfortunately, I found this kit to be somewhat of a let down, lacking
considerably in a number of areas. However, with (a lot of) work, it can be made
up into a very impressive model indeed, and I by no means regret building this
one (though whether I would build another is a different story!). The quality of
the mouldings is typical Italeri, nothing more, nothing less. This is not to say
they are bad, they just do not live up to the quality of the likes of Tamigawa.
Landing gear bays are very simplified with little in the way of hydraulic lines,
etc, installed. However what is there is nicely done and looks quite smart when
hit with a nice gloss white. Most of the bay will be fairly invisible anyway
once those huge gear doors are installed! Cockpit detail is very sparse, and
although there is currently very little photographic reference on the Raptors
cockpit, they could have ‘imagineered’ a little more detail. I must say that
this kit has one of the most beautifully moulded canopies I have ever seen on
any kit, wonderfully crystal clear and blemish free. This is a good thing as the
Raptor’s got one helluva huge piece ‘o glass for a canopy! One of the most
glaringly obvious omissions is the lack of ‘cats eyes’ at strategic
positions on the control surfaces. These cutouts help disperse the radar energy,
rather than return it to the transmitter. They are quite a prominent feature,
and their omission from the kit is quite obvious to the trained eye. A shame
really, as apart from this, it looks lovely once assembled and painted. Oh
well…
First we begin with the cockpit, which is pretty basic. The seat is passable
with a little extra detailing. I initially considered replacing it with a resin
seat, but opted to put in a Hasegawa pilot instead (no pilot is included in the
kit). The seat was painted and detailed then the pilot and seat belts were
added. This assembly was then placed to one side until final assembly. Now for
the cockpit tub. There is no detail at all behind the seat, so I decided to
scratch build an avionics box either side of the canopy actuator, as well as a
LOx (Liquid Oxygen) reservoir. The avionics boxes were simply two small pieces
of balsa cut to the right size and shape and glued in place. The ‘covers’
were simply facial tissue wet with a white glue/water combination, and
positioned to cover the balsa. Once painted black and drybrushed, the results
are quite realistic. The end result may be far from authentic, but all the same,
looks the part and gives a nice busy feel to the area behind the seat. The
instrument panel is one large decal, however, this is actually replicated well
by Italeri, and once in place also plays it's part. All that is left to do then
is paint the side consoles in black, and pick out the buttons with a dab of
white, with a spot of red or yellow to add colour. Once that is done, the
cockpit can be assembled and inserted into the upper forward fuselage.
Next up was
the weapons bays and main undercarriage bays, which were sprayed gloss white and
given a wash before being inserted in their appropriate position. The larger of
the weapons bays, on the bottom of the fuselage, was moulded integrally with the
fuselage, so was simply sprayed white, while the same can be said for the nose
gear bay. At this point the engine exhausts need to be added. The kit exhausts
consist of a number of relatively featureless panels for the vertical sides of
the exhausts, while the vectoring parts of the exhausts have more detail, which
is a good thing, as they are quite visible when assembled. The instructions are
a little unclear as to just how these vectoring sections are to be installed.
Due to the curvature of the fuselage, these sections cannot be glued down along
their entire length. This means that they will either be glued at the front,
leaving a gap at the back, which is very prominent, or glued down at the back,
so that when you look up the exhausts, they are almost entirely closed up,
meaning that you cannot see the rear of the engine. I decided to bend the back
of these panels downward so that when they were installed the gap was filled and
you could see the back of the engine. Not entirely sure if this is correct, but
it looks better than the alternatives. (Access to reference material at a later
date helped clear up the confusion. Always happens AFTER you finish the model
*sigh*  ...) Luckily, the rear of the two
engines are moulded as one onto a large plate which fits into a slot in the
fuselage. This ensures that both the engines are aligned with the nozzles when
looking up the back end. All these parts need to be painted before installation,
and I simply hit them all with some Model Master Titanium from their Metalizer
Lacquer range. ...) Luckily, the rear of the two
engines are moulded as one onto a large plate which fits into a slot in the
fuselage. This ensures that both the engines are aligned with the nozzles when
looking up the back end. All these parts need to be painted before installation,
and I simply hit them all with some Model Master Titanium from their Metalizer
Lacquer range.
|
Click on
images below to see larger images
|
|

|
 |

|
Next
to be installed is the gun muzzle, which will be visible if the gun door is
open. I elected to have this door closed and so refrained from installing the
gun. There is also a similar assembly on the other side, however I was unclear
as to the intended function of this device, and so elected to have its door
closed as well. The
intake area could have done with more effort, to be honest. It consists of two
contoured ducts (left and right) which glue in place to cover up the internal
main weapons bay. The main problem is that only the bottom and sides of the
ducting is included, so if you look up, to can see the inside of the upper
fuselage! Out with the trusty plastic card, and a roof and a few other bits were
made to make it a little more authentic. That’s better. Not a big drama, but a
pain nonetheless. The biggest headache is after the fuselage halves are together
and you add the front lips of the intakes. Each intake is basically a ‘U’
shape with the top of the U blending into the top face of the intake. The
outside edge of the U is curved outward at the top and is supposed to blend in
with the top of the intake. Good in theory, but pretty much a failure in
practice. After mucking around and trimming the thing to get it to fit, it was
easier to just cut it off and fill and sand with putty. Again, not a hard job,
but one which I really shouldn’t have to do.
The Raptor is a huge bird, and as such, so is the kit. This means that the
fuselage is long and has to be ’cut in half’ somewhere to make it fit in a
smaller box. The upper fuselage is cut off where the leading edge of the wing
meets the fuselage, with the nose section making up the remainder of the upper
fuselage. Incidentally, the wing is moulded integrally with the fuselage,
eliminating the need to fill and sand wing/fuselage joints. The joint between
the front and rear fuselage does take some work to fill however. It can be
filled and sanded without too much difficulty, but due to the flex in the
fuselage it kept cracking, and the only fix was to run a bead of superglue along
the join and sand smooth. It is at this point that you are supposed to install
the movable flaps, however one flap drooped lower than the other so I elected to
glue them in the down position.
The remainder of the fuselage assembly went without major problems, with most
edges requiring at least a little filler to blend the joins. The only other real
hiccup on the fuselage was on the tail outboard of the engines. For some unknown
reason, rather than mould the entire tail section integrally, on the underside
Italeri elected to cut the extreme rear sections off and include them as
separate mouldings. This is a problem as the fit here is very poor, and required
considerable amounts of filling and sanding to fix it, to the point where the
panel lines had to be re-engraved. Luckily it is in the underside and so is not
really visible unless you are looking for it. Why Italeri chose to do this I
don’t know.
The weapons
bay doors are without a doubt the worst part of the kit. Italeri’s F-22 was
obviously designed to be built with all the doors open to show off the
internals. In fact, one wonders if anyone at Italeri bothered to see if the
doors would actually fit if closed. It was virtually impossible to get the saw
tooth edges of the doors to line up with the bays. The only real acceptable
solution for me was to align them as best I could and glue them in position.
Then out with…… you guessed it…… the trusty filler! And fill I did! The
saw tooth edges were basically filled in and then rescribed. This coupled with
the doors for the arrester hook was one of the most time consuming and tedious
parts of the kit and in fact was the cause of me putting it aside for
almost a
year in disgust! The arrester hook doors ended up almost entirely filler, the
fit was that bad!!! Both the vertical and horizontal stabilisers were assembled
and installed without any real problems, and finally the assembly was nearing
completion! The assembly of both the nose and main gear went off without a hitch
(finally!) and most of the time on the landing gear was taken up with painting.
The gear legs and wheel hubs were sprayed gloss white, and when dry, given a
light wash to add depth. The tyres were painted with AeroMaster Tyre Black. To
finish off, the oleos were given a coat of Model Master Chrome Silver. This
stuff is awesome, and looks like real liquid chrome! The landing gear assemblies
were then put aside until after painting was completed. Now the fun really
begins………
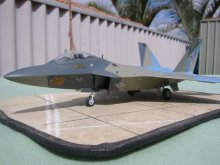
It
is at this point where I deviate enormously from the instructions. I am a
bit of an aggressor freak, I love all the really cool paint schemes, not to
mention the cool planes they’re painted on! I have always wanted to design my
own paint scheme for an aggressor and so, after all the grief this kit had
caused me I thought it was about time for a little fun. I had originally wanted
to do both the ‘real’ Raptor and an aggressor, but I didn’t think I was up
to going through all that drama again any time soon, so I decided the aggressor
would come first. Besides, my shelf has too many grey planes. It needs some
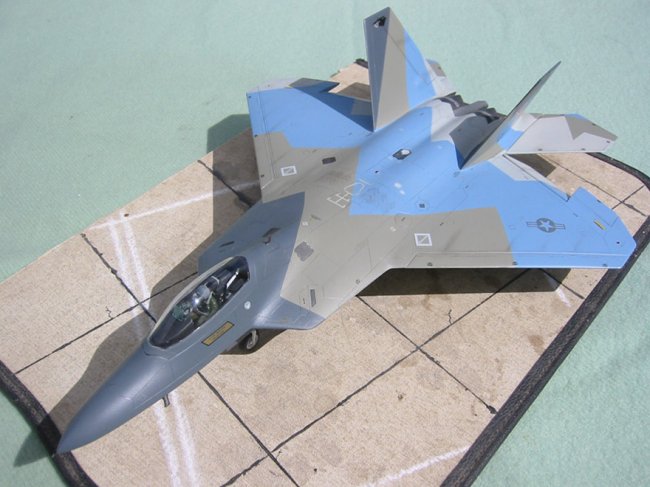
colour. The first thing to do was to design the paint scheme. Now, an idea may
look really good in your head, but once it finds it’s way to reality……
Yuk! So I needed to draw the scheme and see it outside my minds eye. So off I
went to my trusty computer, and enter good old PhotoShop 5.5. Using a black and
white three view drawing of the Raptor I mucked around for ages with different
paint schemes until I found one I liked. After settling on a splinter scheme, I
decided on a four colour scheme of dark grey, grey/green, sky blue and light
grey. Once the design was finalised on the computer, it was time to find a
colour match in my paint stores.
For
the dark grey, I ended up using a perfect match of FS 36118 Gunship Grey, while
the grey on the opposite side of the spectrum was FS 36622 Camouflage Grey. To
find the remaining two colours I needed to turn to my WW II collection, with
both Allied and Axis colours used. For the grey/green I settled on the German
colour of RLM 02 ‘Grau’ which is a very ’green’ grey. Finally the need
for a sky blue was met perfectly with XtraColour X26 RAF Azure Blue. Now I had
my colours, it was time to begin the painting process……
It
was at this stage that the serious masking began. Let me just tell you, a
splinter camouflage is a very time consuming process! At least 80% of the
painting time was taken up in masking alone!!! The results however are well
worth it. I worked my way through the colours, masking, painting, removing the
masking, then repeating the process all over again for the next colour,
remembering to paint the gear doors and the like as I arrived at the appropriate
colour. I’m glad I only decided on four colours, and not eight!
Once the paint has cured, I like to highlight my panel lines with a draftsman's
clutch pencil. This makes the panel lines more obvious while still remaining
subtle. I do this before I put on the gloss coat as the graphite will adhere
much better to the paint than to the polish. For the gloss coat, I hit the
Raptor with the trusty acrylic floor polish, to give the decals a shiny surface
to adhere to. I use Johnson’s Super Shine, but there are a few others out
there which are just as good.
Now
the real fun begins! I had to decide what markings I wanted to put on this
beast, so it was time to rummage through the monumental amounts of decal sheets
I had for something appropriate. I decided that I would use the data stencils
from the kit decals, as well as a couple of the ‘stars and bars’. The
remainder would come from other sheets. A small amount of stencil data, as well
as all the ‘No Step’ markings came from a couple of different F-15 sheets. I
found an old Super Scale International decal sheet of A-4 and F-5E Top Gun
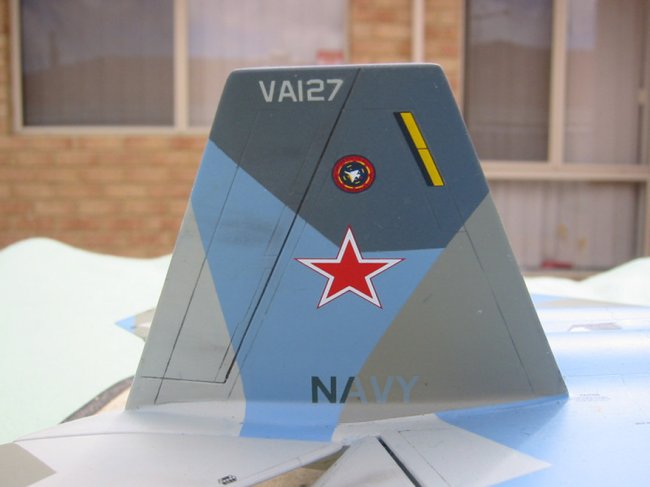
aggressors, and elected to use this for a source as well. Although Top Gun has
actually been disbanded, I thought it would look cool with the logo on the tail,
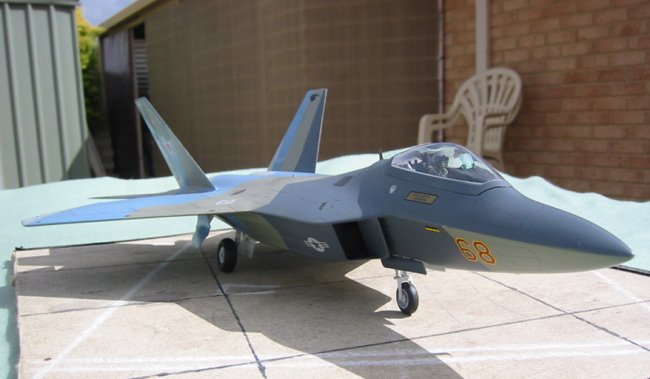
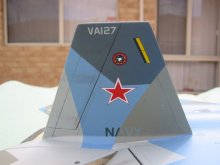
even if this Raptor technically could never exist. I needed some nice, big,
colourful Russian style nose numbers, and I found them on an old Monogram F5-E
aggressor decal sheet. A big red and yellow ‘68’ to be exact. Perfect. And
of course no "Russian" aggressor is complete without a big fat red
star on the tail. I managed to find the perfect candidate on an aftermarket
decal sheet for the IL-2 Sturmovik. Sweet! To finish it off, I needed that
extra ‘something’, which I found on an old sheet for an F-16. Namely the
wolf’s head from one of the Korean based F-16’s of ‘Wolf Pack’ fame. Now
I had all the decals I needed, all that was left was to actually put them on.
|
Click on
images below to see larger images
|
|
|

|
|
I
used Polly S decal softening solution to make sure they all sat down snugly into
any panel lines. This solution is the best I have used, and so far (touch wood)
I have never had any adverse reaction with any decals. Once all the decals were
on and given a few days to set, I gave it a quick rinse with cold water. This
simply washes off any dried decal adhesive and setting solution. The decals were
then sealed in with another coat of polish and then finished up with a coat of
dullcote to deaden it back down to a flat finish. The end is nigh!
After the
decal work was completed, my attention turned towards the exhausts. Once again
more masking is in order, and I used not only the Titanium, but Steel as well,
for added depth. Anyway, mask, mask, paint, paint, remove mask, done. Now,
we’re nearly done. Time to remove the masking from the cockpit and landing
gear bays. It was at this point that the pilot, attached to his seat, was glued
in place. Now all that’s left to do is add the undercarriage, doors, aerials,
and that lovely canopy. The pitot tube was too thick scale-wise, so I trimmed it
off and simply replaced it with a little stretched sprue. Much better. Just a
word about the canopy. If you elect to have it open, you will need to scratch
build canopy hinges, as on the kit the only thing holding the canopy open is the
actuator! Interesting! I elected to close mine (funnily enough). I gave the HUD
a tint of clear green before gluing it in place with a few tiny dobs of super
glue. The navigation lights were painted with Chrome Silver, followed by the
appropriate clear red or green as required, giving a very authentic looking
light. The last thing to go on was the canopy, after which the aircraft was
given a light weathering with pastels and we’re done!!!! The only regret I
have on this paint scheme is that there is not enough contrast on the word
‘NAVY’ on the tail, and the colour behind it. The word overlapped two
different colours and so I had to use different colours to match, which meant
using an ‘NA’ of this colour, and a ‘VY’ of that. In the end, there
wasn’t enough contrast in the colours, and some of the letters are not as
obvious as they should be. Oh, well, live and learn……
FINAL
WORD…
This kit is definitely not without its problems, and when it’s quality is
compared to the likes of Tamiya or Hasegawa, it is simply not in the running. It
requires more effort than should really be needed of a kit this recent. I
don’t know, maybe we are just spoiled for choice, but I was expecting more. On
the down side, if you want a 1/48 F-22 Raptor, this is your only choice. The
Revell version is simply this kit reboxed, so don’t bother going there. On the
upside the end result looks fantastic on the shelf next to my Phantom and Eagle.
There are a few problems, some major, some minor, but with some work they can
definitely be overcome by anyone with half a dozen or so kits under their belt.
I don’t know if some of these issues happened to be just my kit, or if it is
an issue on all of them. Some reviews I have seen were more favourable than
mine. I guess it is up to you to make up your own mind and give it a go
yourself. If you want to save yourself a lot of work, then build it with the
weapons bay doors open. You are given a good choice of ordnance, and it will
look pretty impressive sitting inside the weapons bays. Personally, I thought it
would ruin the lines of the aircraft, which is why I built them closed. Either
way, be prepared for something that ain't "shake-n-bake".
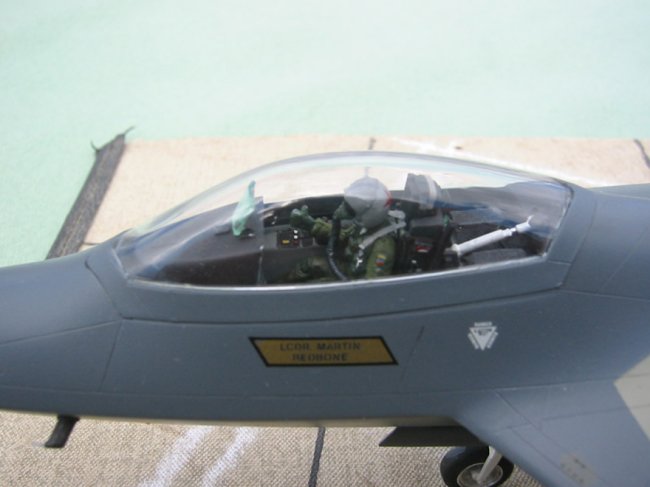
You really
will need to add some sort of detailing in the cockpit area, as that huge piece
of glazing means that the cockpit interior is very visible. The added bonus of
putting a pilot in was that it hides some of the cockpit and the detail (or
rather, lack of) is less obvious. Plus, the red star on his helmet looks cool!
Well folks, that’s pretty much it. I guess the big question is ‘was the
effort worth it?’ Definitely! Even if I had elected to build one of the
‘real’ Raptors (do good research here, the decal instructions aren't
entirely accurate), it was worth the effort to have at least one in my
collection. It looks very impressive on the shelf. Would I build another one any
time soon? I’ll get back to you, the jury’s still out on that one ………
Happy modelling, and may you never superglue your elbow to the model bench!
Sam
|
Click on
images below to see larger images
|
|

|
 |
|
|