|
All I have to say is
that one of my all time favorite aircraft is the F-14! With their beautiful
lines and squadron markings they wear, I had to build this astounding aircraft.
Ironically, I didn’t have one built in my collection, so that gave me a reason
to take this on as my next project. I also wanted to build a more recent version
of the F-14, so that left me with either the B or D model. I chose the D model
simply because I got the most recent offering from Revell-Monogram. This was my
first attempt to build the Monogram kit in 1/48 and I realized how difficult the
project would be after opening the box. I have the superior Hasegawa kit, but
decided on the Monogram kit since the Hasegawa kit has its share of problems
too. Besides, with the price at $13
bucks…you can’t go wrong!  All it needs is some TLC.
|
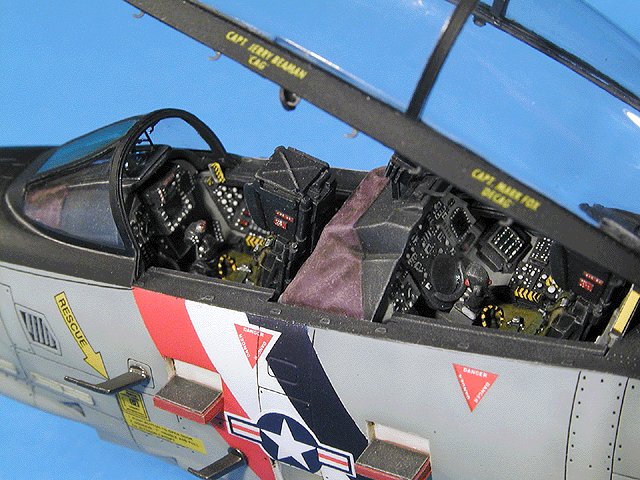
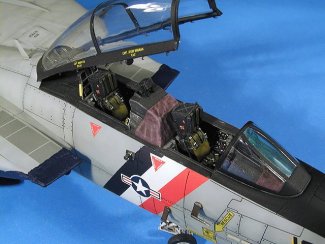
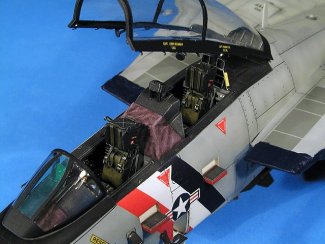
Cockpit:
Upon
inspection of the kit parts, I noticed that the cockpit was actually for
the A model instead of the D model as advertised. Monogram is notorious
for that! Also, I wasn’t too satisfied with the level of detail the kit
parts offered, so I picked up a cockpit set and a pair of Naces seats from
True Details. Although the cockpit set was designed for the A model, I was
satisfied with its fit and detail. The only obstacle I had was to update
the set to D standards, which wasn’t difficult at all. I also picked up
a photo-etch set from Eduard (No.
48304) to dress it up even more. I was surprised to learn that they
actually made one for the Monogram kit and that it happened to be made for
the D model too! |
Click on
image below to see larger image
|
 |
|
| I
updated the set by removing the analog gauges on the right side of the
main instrument panel and replaced them with CRT screens from the Eduard
set. The rear instrument panel was fine with the exception of the CRT
screen I added on the right side of the panel. I also added a control
stick on the left console for lantirn targeting capabilities. There was no
need to modify anything else since my references show that both the A and
D models have the round TIDS instead of the square PTIDS found in the B
model, so I was done. The sidewalls in the kit looked fine to me so I left
them alone. I sprayed the entire set with MM Dark Gull Gray (FS 36231) and
painted the rest according to my references. I shot a coat MM Gloss Acryl
to seal the paint and applied an oil wash with Windsor Newton Payne’s
Gray. I finished the cockpit with a coat of Testors
dull coat and started on the canopy and windscreen. |
The canopy from the kit was fine
and just needed some detail and good paint job. I polished the clear parts with
Tamiya compound until it was shinny enough to my liking. Referring back to my
photos, I noticed that this aircraft has a blue/green windscreen so I masked and
painted the center section with Alclad clear blue/green to represent that minor
detail on the model. (Be sure to check your references for the specific aircraft
your modeling, because not all Tomcats seem to have this detail). Next I added
photo-etch and copper wire inside the canopy after dipping the clear parts in
Future. The finished subassembly was set aside after I painted the inside
framing with MM Interior Black then I moved on to the airframe.
|
Click on
images below to see larger images
|
 |
 |
Airframe:
As you know, this kit has been
around for at least 20 years and is definitely showing its age by the amount of
flash and ejector pin marks found through out the kit. It’s a lot of cleaning
up, but nothing an X-acto knife can’t fix. The panel lines are, of course,
raised and the details are soft. However, Monogram did get the overall shape of
the aircraft correct and provided the necessary parts to build a D model, which
include the GE-110 exhaust cans and the dual chin pod. They missed a few
details, but can easily be scratch built. My biggest task was to scribe all the
panel lines comparable to today’s standards. It’s not impossible, but very
time consuming! (This is my 3rd fully scribed model and still
counting.) First, I checked out my references to see which panel lines were
either correct or missing so I can start scribing the model. After a couple of
months, I finally finished the entire model. On top of scribing, I still had to
do some refinements and modifications to bring the kit up to standards
Modifications:
I wasn’t satisfied with the vents on both the front and top sections
of the fuselage because the detail was a bit soft so I scratch built my own
using strip styrene. I cut out the existing vents and cut the openings to the
appropriate shapes. Then I glued bits of .010 triangle strip styrene next to
each other on top of a piece of .010 sheet styrene. Next, I cut it to the
shape of the opening until it matched and in essence made a ‘plug’
installing it from the inside.
I cut off the horizontal stabilizers from the fuselage so I can
reposition them later in the build. I drilled holes on each side of the
fuselage where they pivot and installed bits of plastic rod on each
stabilizer. I was very cautious when drilling the holes to ensure that the
alignment wasn’t compromised.
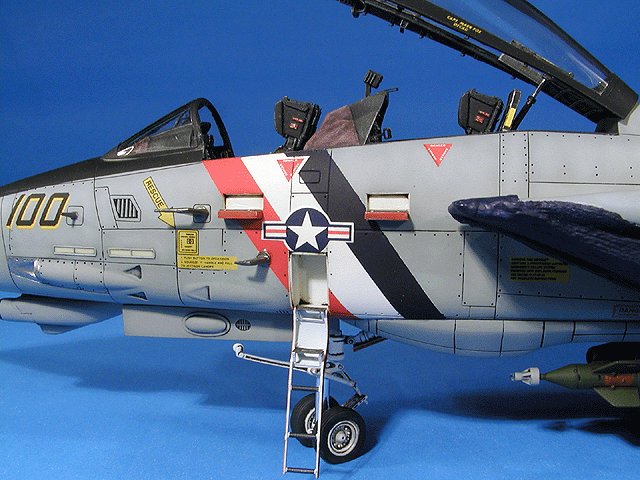
I cut out the
boarding ladder doors so that I can reposition them in a deployed fashion.
Fortunately, the Eduard set included all the access panel doors but neglected
to include the actual compartment walls for the ladder. All they give you is a
one-piece wall that you would laminate from the inside. I wasn’t satisfied
with that so scratch built the ladder compartment out of sheet styrene. To do
so, I used a contour pin gauge to measure the inside dimensions so that I can
make cardboard templates. I continually test fitted until I got the fuselage
halves to meet without any interference as well as the cockpit tubs and the
nose gear well. Once I got everything to fit, I made the compartment walls out
of sheet styrene using the templates as my guide.
The nose gear
door had to be modified to include an ECM bump located on the outside of the
port nose gear door and to remove the antenna blade in its place. The kit
lacks detail in the nose wheel well section so I added my own. Coincidentally,
the cockpit set from True Details not only includes the tubs, but also the
ceiling for the nose wheel well. That left me with 4 sections to detail –
More on this in a minute.
The intakes are molded together with a small section of the
forward fuselage. I don’t understand why Monogram engineered the parts this
way? To avoid any visible seams and gaps, I cut the small fuselage sections
from the intake parts so that I can fair them in separately. This step
simplified the sanding as well as the installation of the intakes. A small gap
where the parts were cut became visible, but I fixed it with strip plastic.
The wings came in 4 pieces (2 top and bottom halves) with a gear
mechanism molded to the bottom halves. I didn’t plan on playing with the
model when I finished so I cut the mechanism off for ease of paint and
assembly. The bottom half of the wings also have holes allowing them to pivot.
In order to install the wings after the fuselage was assembled, I cut a slot
the size of the hole on each wing and secured them in fuselage with a 15
epoxy, later in the build.
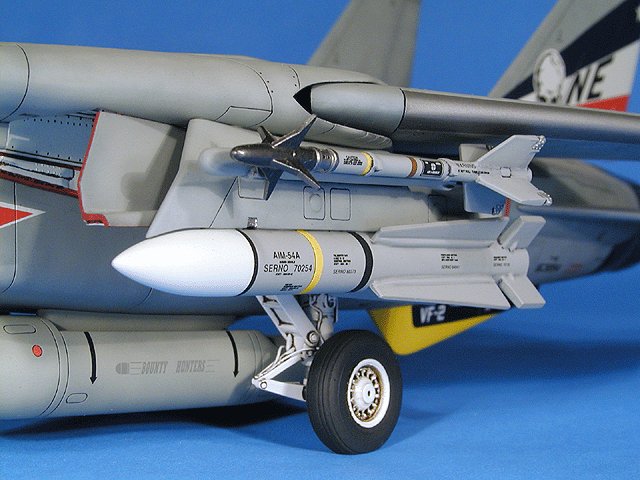
The wing glove pylons from the kit
are 2 halves with the AIM-7F Sparrow missile molded integrally. I didn’t use
these parts because the adapter wasn’t correct for the AIM-54 Phoenix
missile that I wanted to load the aircraft with. Instead, I got the ones from
the Fujimi kit and modified the starboard pylon to accept a Lantirn pod that I
got from the Hasegawa weapons set D. I scratch built the hard point for the
Lantirn pod and installed it later in the build.
Another
modification was to replace the LAU-7A launch rails for the Sidewinders with
the current LAU-138 BOL chaff dispensers. I borrowed the resin parts from the
Hasegawa ‘Lantirn’ release along with the white metal bomb shackles for
the missile pallets under the aircraft. You can now get these parts from the
Black Box Combat series set for the Bombcat.
Last but not least, one of the distinctive features between the A model and
the later B and D models have to be the squared engine fairing located just in
front of the exhaust cans. Monogram didn’t correct this when they released
the D model so I corrected it by masking the section off with Dymo tape and
filling in the section with liquid plastic. (This technique can be found in
the “Tools n Tips” section). It took around a week for the liquid plastic
to set, but it was as hard as the plastic around it. When I took the mask off,
I filed and sanded the section until the “squared” profile was achieved.
After I dealt with these issues, I finally moved on to the undercarriage.
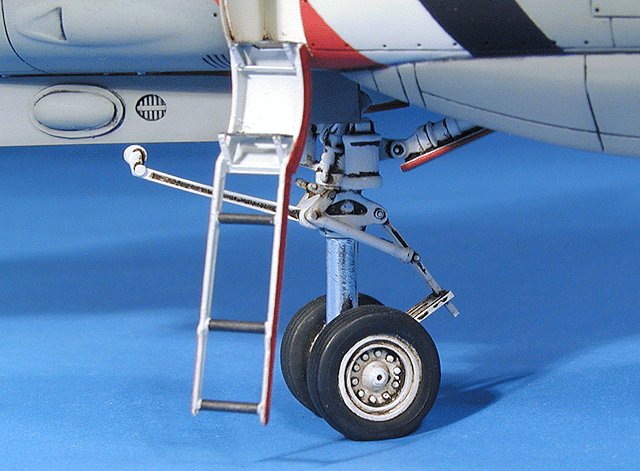
Undercarriage:
Monogram simplified the landing
gear by omitting some of the detail and molding the actuators together. They are
actually nice once the flash was trimmed away, but I wanted to add and replace
some detail that was missing. I added hydraulic lines and replaced some of the
detail with either strip styrene or parts from the Eduard set, such as the
“scissor links” and the tie-down rings. For kicks, I modified the nose gear
by cutting the bottom half off and repositioned it as if the plane was turning
on deck.
The wheel wells
had some basic detail, but not enough to my liking. The walls were empty so I
added hydraulic lines and strip styrene to spruce it up. When I applied an oil
wash, all the fine details became apparent. The wheel doors were very simplified
and the detail was soft. Thankfully, the Eduard set includes the ribbing inside
the doors as well as the hinges. A nice touch by Eduard! All I needed now were
some nice wheels to go with the struts.
The wheels provided in the kit
were nice, but the wheel hubs were inaccurate. I picked up a set of wheels from
Cutting Edge to solve my problem. The wheels were cast in gray resin and were
“weighted”. I drilled a hole in each wheel so that it would accommodate the
gear strut and finished them off with a nice paint job and an oil wash. These
additions and modifications added so more to the finished model’s appearance.
So now it was ready for paint!
Paint:
Current F-14s
are painted in what’s called a Tactical Paint Scheme (TPS), which include
Medium Gray (FS 35237), Dark Ghost Gray (FS 36320), and Light Ghost gray (FS
36375). However, after a couple weeks into a cruise the paint looks closer to
Dark Ghost Gray so check your references. I preshaded the entire model with
Tamiya Dark Gray followed by MM Dark Ghost Gray. Then I painted the bottom with
Light Ghost Gray. To bring out the scale effect, I lightened my base color with
white and sprayed it randomly over the model. I concentrated on the center of
each panel, because this is where most of the fading occurs on the actual
aircraft. Careful not to over weather your model though, especially a CAG bird,
like in my case. After a few hours of airbrushing the model, I shot a couple of
coats of Future and the model was ready decals.
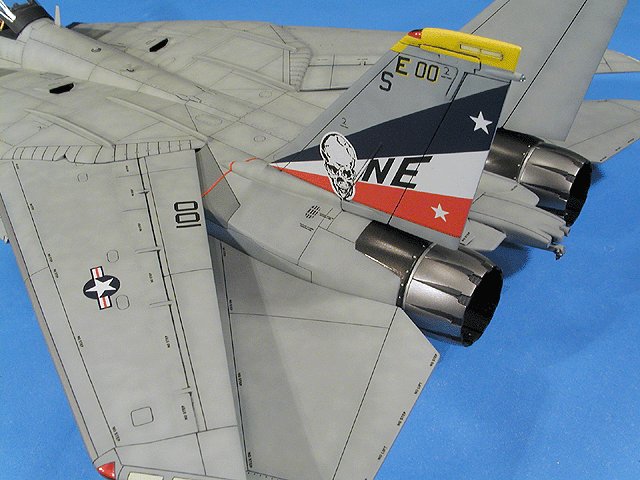
Decals:
Originally, my
plans were to build the CAG bird for VF-31 “Tomcatters” as it appeared
during the Roving Sands exercise back in ‘98. However, a good buddy of mine
who visited a friend aboard the U.S.S. Constellation (CV-64) just before 9/11
had some great shots of VF-2’s CAG bird and I was sold on the scheme. There
are only 2 decal manufacturers that offer these markings that I know of, Eagle
Strike and Superscale. I compared both sheets and realized that the SS sheet was
for the same aircraft that were in the photos so I made a point to model the
aircraft as it appeared at that time. I did, however, wind up using bits and
pieces from both the Eagle Strike sheet and the CAM sheet anyway. At the time
the photos were taken, the external fuel tanks were painted in light gull gray
with the old ‘Bounty Hunter’ logo on it so I took those from the CAM sheet
since they were not provided in the SS sheet. The modex numbers on the nose of
the aircraft came from the Eagle Strike sheet along with the carrier name that
is suppose to be on the wing glove. I believe Superscale forgot this minor
detail because it wasn’t on their sheet too?
The data and stenciling came from the Aeromaster low-viz stencil sheet. I
applied all the decals with some Microset and Microsol. I was careful not to use
too much of either decal set because they are ammonia base, which would soften
my coat of Future.
The only
problem that I did come across was that the Langley stripes on the Superscale
sheet didn’t fit properly. Having applied the tail art already, I had no
choice but to mask the forward fuselage section so that I can paint them
instead. Another problem was to find the colors to match the tail art. I tried
several different colors and found that both Tamiya Italian Red and True Blue
from their spray can line were a dead match.
I took
measurements from the Superscale sheet and made a mask for each stripe using a
compass. The compass allowed me to make equally spaced stripes. Then I masked
off the entire section starting with one outer edge and temporarily masking each
stripe working my way back to the other outer edge. Now I took off all the
masking tape for the stripes except for the outer edges and the center stripe so
that I can paint the entire section with 2 light coats of Tamiya Flat White. The
white base coat will allow any color to appear vibrant when painted on top of
it. I continued to paint and mask each stripe with 2 light coats of each color
until they were both done. Having them painted in 2 light coats instead one
heavy coat will prevent ridges between each color. Next, I shot a light coat of
Future on this section and it was ready for some weathering.
Weathering:
Since I
preshaded the model before I got to this step, the weathering was actually half
done. The only thing I wanted to do at this point was to highlight the panel
lines with an oil wash. I mixed some Windsor Newton Payne’s Gray with some
Turpenoid till I had the consistency of milk and proceeded to hand paint the
wash into the panel lines. Capillary
action carried each drop of my oil wash along the panel lines without any
surface tension. I repeated this step until the entire model was done and wiped
off the excess with an old t-shirt after 30 minutes of drying time. I touched up
some areas that I wiped off too soon and let the model dry over night. I
followed this step with a couple of light coats of Testors Dullcote.
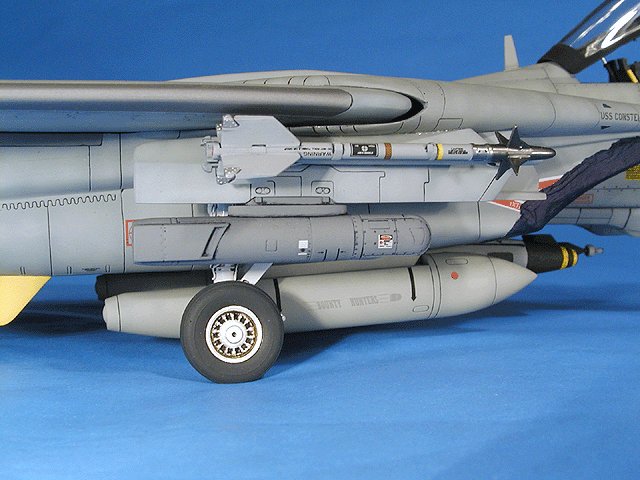
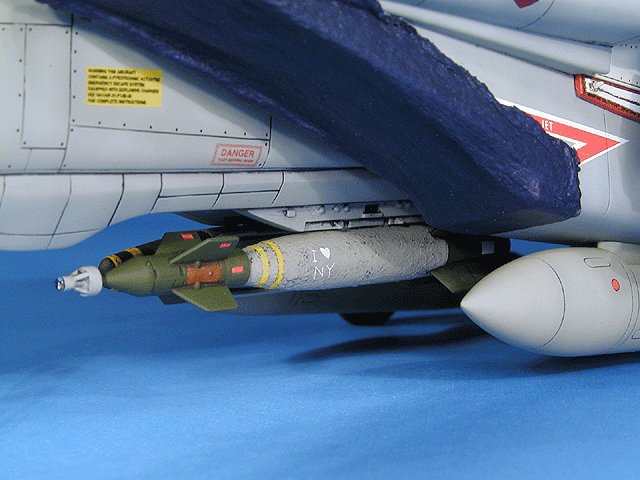
Ordnance:
I
wanted to model my F-14 with the latest and greatest weapons in the US arsenal
with an asymmetrical load out as they appeared in OEF and OIF. I installed a
GBU-16 and a GBU-31 (JDAM) on the front pallets under the aircraft and left the
two rear pallets off so that I can install an AIM-7F Sparrow on the center
station. These came from the Hasegawa D weapon set as well as the lantirn pod.
The AIM-9L Sidewinders and the AIM-54 Phoenix missile were from the kit. These
parts were actually nice once I removed all the flash. The data on the bombs and
missiles were from a Scalemaster sheet while the bomb graffiti were from a left
over CAM sheet that I had. Although the graffiti is not accurate, I thought it
would look nice to have it on anyways.
Finish
Touches:
To finish the
model, there were still a few things left to do. These would include scratch
building a taller TACAN antenna and a GPS dome just behind the cockpit, adding
reinforcement plates on the spine, the burner cans and the flame holders, and
all the fine details like pitot tubes and antennas. I would like to also mention
that I used the Hasegawa burner cans instead of the ones from kit along with a
modified flame holder simply because they were much nicer and had less fit
problems.
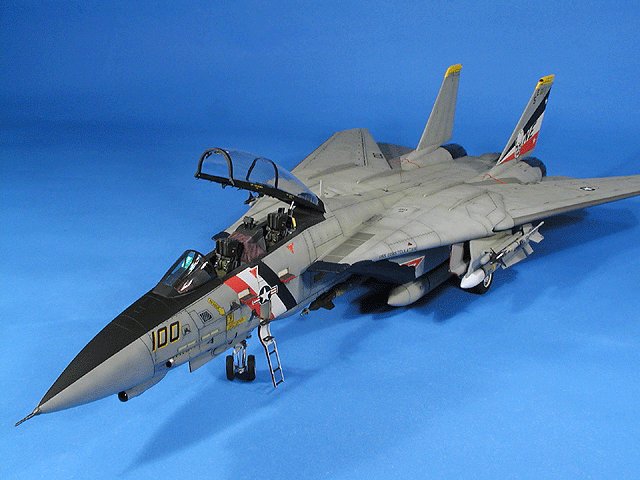
Conclusion:
Though not the
easiest route to build a 1/48 Tomcat, the finished model demonstrates what is
possible with the old Monogram kit. Also it was one of those models that helped
me improve upon my modeling skills. I have to admit that the next time I build a
Tomcat in 1/48, I would rather build either the Hasegawa or Academy kit first,
because I don’t plan on building another one of these again!
This model also took a 1st at the 2003 US Nationals in OKC!
A lesson
learned from this model was not to use Tamiya acrylics or Future as a base for
Alclad II…well at least for Duraluminum. My results show that after a couple
of weeks, Alclad begins to form spider-web cracks! It was a frustrating
experience after trying it 3 times. I found that Mr. Surfacer, MM enamel Gloss
Black, and even Tamiya TS work much better. Spraying Alclad directly on plastic
works too! Also I’ve heard from others that automotive lacquers and even
Krylon works, but I haven’t tried them myself.
I like to thank Greg Cooper from Scale
Quest for the photos and his support!
“The
Virus” – Out!
|