|
|||||||||||||||||||||
|
|
|
|||||||||||||||||||||
|
|
|
|
||||||||||||||||||||||||
|
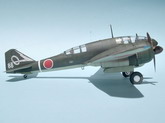
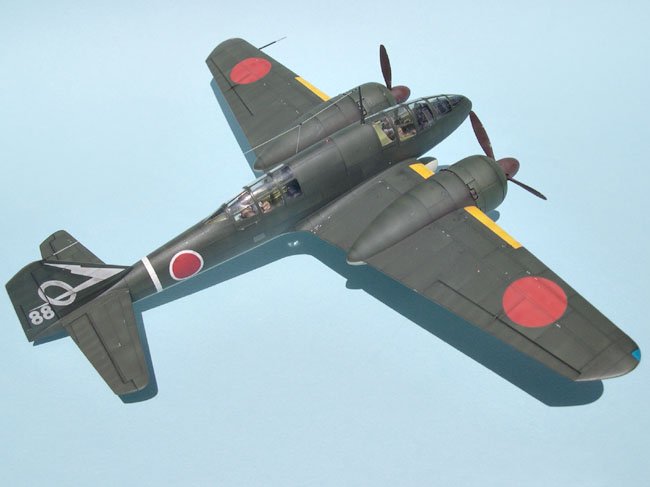
This is my model of the Japanese reconnaissance plane built with the kit markings of Hiko 10th Sentai, 1st Chutai. This is another beautiful model kit by Tamiya that fits together extremely well. The model is built out of the box with a few very minor additions. The only problems that I encountered during construction are the wheel wells which have a joint down the centre that it is difficult to putty over and sand smooth due to the narrow space to work in. Each of the front and rear canopies come in three pieces and I experienced alignment problems with the rear glazing pieces. However after applying Gunze Mr Surfacer 500 to all the canopy joints followed by much sanding and repolishing with Tamiya polishing compound I managed to get the canopies to blend in reasonably well with the fuselage. The additions I made
to the kit are replacing the loop antenna and adding brake lines to the main
landing gear struts with 0.2mm copper wire. The antenna wire was made from
stretched sprue with 5 minute epoxy insulators. I also flattened the tyres using
a file to give the model the correct sit.
The model was sprayed with my Aztek A470 airbrush using Tamiya acrylics and enamels throughout. The cockpit and wheel wells were painted as per the kit recommendation which is 1 part XF-3 flat yellow, 1 part XF-21 sky and 1 part XF-58 olive green. This was then shaded with an airbrush and a very diluted solution of XF-58 olive green followed by dry brushing with a light yellow green color of Jo Sonja Artist acrylic paint. The pilots were undercoated with Tamiya flat white and then painted with Jo Sonja artist acrylics using standard acrylic figure painting techniques of adding highlights and shadows using lighter and darker mixes of the base color and outlining certain parts of the uniform with a very dark color. The plane was painted with Tamiya XF-13 Japanese Army green to the top and XF-14 Japanese Army grey to the underside. For the gear struts I used Tamiya X-11 Chrome silver enamel. The model was weathered with a lighter mix of the camouflage color sprayed randomly and then all the panel lines were highlighted by spraying a darker mix of the camouflage color using low tack masking tape as a guide. If you wish to learn more about this weathering technique, I can highly recommend the book "Applied Modelling Encyclopaedia" available from Squadron. The book is filled with many modelling and finishing tips and of course many superbly built and finished models.
All the markings on the kit have been sprayed with a airbrush using Scotch 3M Safe Release painters masking tape No. 2080. The only decal used was the tail and fin markings applied over a coat of future acrylic floor sealer. Hope you enjoy the photos! Kevin Jongen
|
|||||||||||||||||||||||||
Photos and text © by Kevin Jongen