1/48 Zhengdefu FB-111
converted to F-111G
I must say that curiosity led me to buy this kit of the FB-111 from Zhengdefu. And I must confess, I didn’t stop there, I bought two more kits- the EF-111 & Su-27 but more on these two kits later…much later. So with all the bad press that’s been going around, I just had to buy it and see what all the fuss was about.
Depending on where you buy this kit from, the price ranges from $10 to $15 Australian dollars. Definitely not too much for a 1/48 scale kit.
The kit comes in a sturdy box and all sprues are wrapped in plastic quite normal indeed! Closer inspection reveals that the plastic is little thick, not so smooth, panel lines a bit deep and the molding not that crisp. Dimensions and shape are okay.
Areas of concern, are the canopy, general fit and decals. First up the canopy is a little cloudy in appearance and the one I got had an air bubble in it. So before I threw it out I vac-formed a new one to replace it. Even if the canopy did not have an air bubble in it, I still would have thrown it out and vac-formed a new one.
The overall fit of model is poor, especially joining the forward section to the rear fuselage. The end of the forward section tends to dip inwards creating a noticeable gap. I used Tamiya putty to fill and level of this area. Once I had the two sections joined I used wet and dry sandpaper to sand the plane. I then re-scribed the areas where the panel lines had been removed by sanding.
The wings have an awful seam line on the surface that needs to be sanded down, easy to fix no real drama here. The wings were not attached during the building process but rather once I had finished the painting process, after which time they were slotted into place. To do this I removed the located pins from the rear fuselage before gluing the two halves together. Also by assembling the rear fuselage this way, it gave me a better chance to work on the bladder. The bladder was made from strip styrene.
|
Click on
images below to see larger images
|
|
|
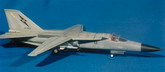
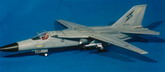
Moving onto the kit decals, simply not usable, throw them out. I replaced them with Hawkeye Models Australia F-111C/G decal sheet. As can be seen I chose to model my FB-111A as an RAAF F-111G from 6 Squadron from Amberly Air Base. The aircraft was painted overall grey as specified in the decal instructions. Gunze-Sangyo paints were used to paint the model and were applied using a Lenco 301 airbrush. And finally to complete the painting process I sprayed on several coats of Dullcoat.
I chose to model my F-111 with two sidewinders, although you get an array of weapons with the kit the, sidewinders came from a Monogram kit. The pylons carried by an F-111G are different from those carried by an F-111C. The F-111G pylons are pointy while the “C” model pylons are blunt. Using the kit pylons, I cut off the blunt ends and glued on some strip styrene. They were later cut and re-shaped.