|
The Hasegawa Starfighter is just
about the nicest aircraft kit that I have bought so far – not because of its
ease of fit, (there are some problems to be addressed) but because of its
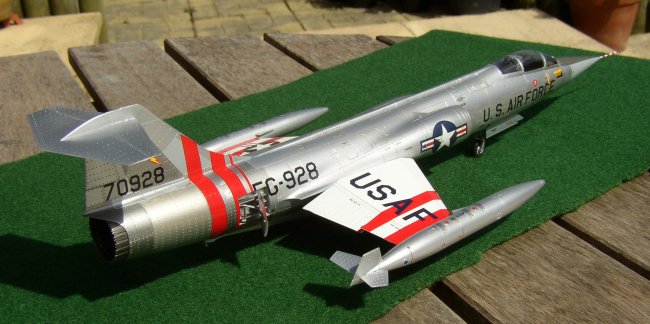
fantastic detail. Because of a screw up I made using the kit decals my zipper
ended up with a bare metal scheme with red exercise stripes from Eagle
Strike’s “Silver
Starfighters” #48029. I also lost my kit pitot tube, and so ordered
Fine
Details excellent but pricey precision turned replacement. After ordering I
found the kit pitot: this left me wondering if I’d deliberately screwed up the
kit decals and lost the pitot just to have the excuse for the aftermarket
goodies!
Generally the kit fit is good. The main problem is with numerous and fairly
visible ejection pin circles on the horizontal and vertical control surfaces and
wings. Repair work is complicated by even more numerous rivet holes around the
airframe. I’ve seen criticism that these rivet holes are far too deep on a
1/48 reproduction. While I’ve not been lucky enough to see a Zipper in the
metal yet, it is probably fair criticism. Regardless I believe that they stand
out and add interest to this wonderful kit. I tackled the ejection marks by
careful, repeated applications of Mr Surfacer 500 and 1000 applied by brush,
followed by a little light sanding while being careful of the wanted rivet
detail. The fit of the nose cone and the area around the cockpit requires a
little gentle sanding to get flush – nothing serious.
The undercarriage is great and fits with excellent poly rings and small dabs of
glue. The model balances nicely without nose weights. Another construction
highlight of the kit is the wonderfully thin wings and flaps – which you can
install flush, or as I did, dropped. With such thin narrow, stubby wings, no
wonder so many Starfighters dropped out of the sky!
|
Click on
images below to see larger images
|
|
|

|

|
A buddy from ARC,
Michael Vorrsi, gave me some great advice with the Zipper bare metal finishes.
He’s done a number of them and one I’d seen “featured” in ARC’s
gallery (Michael's
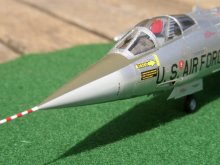
F-104C). For example he pointed out: “The trapezoid panel on the lower
front of the vertical fin is actually gray, as are the wing undersides and the
nose cone, which was bare gray fiberglass.” I checked this out on some F-104
websites and he was right (I am a trusting soul), so that’s what I did! Thanks
Michael. Otherwise I undercoated with Alclad 2 Grey Primer, then used “white
aluminum” as a base, and masked off individual panels with regular Tamiya
masking tape, rubbing lightly over them with a toothpick to highlight the panel
lines and then used a new Swann-Morton blade to cut out the panels precisely. To
these I used “aluminum”, “dark aluminum”, “duraluminum” or “pale
burnt metal”. The Eagle Strike decals came next: the instructions are good, the
decals are in great register and they conform excellently to decal softening
solution. It made me never want to use kit decals again (but I’ve just got a
couple of limited edition Hasegawa kits with Cartograph decals which may save me
some money with a Tomcat and Viper I’ve got waiting in the stash). I weathered
my zipper with two very light washes of burned sienna oil. Added the Fine
details pitot – last so that I didn’t poke my eye out – and voila! I think
that it is my best model so far. Okay, what’s next? Ahh, that F6 Lightning
looks fast…
Simon
|
|