|
Fisher Model and Pattern has long been known for its outstanding resin
car kits. Now, Fisher has made a name for itself in the large scale resin
aircraft market. Fisher’s first release was the F9F-5 Panther, which was
extremely successful. Following on its heals comes the F9F-8 Cougar, the swept
wing variant of Grumman’s F9F series.
Background:
Grumman’s F9F-8 Cougar was the last in a series of designs for the Navy
that started with the straight-winged F9F-2 Panther. After the success of the
Panther design, Grumman began working on a swept-wing variant. The result was
the F9F-6 Cougar, which was little more than a Panther fuselage mated to a
swept-wing. As the design was refined, however, some changes were incorporated
which would produce the -8 variant of the Cougar. Most notable and obvious of
these changes was the lower rudder extension on the tail. Later Cougars also
featured splitter plates in front of the intakes. The service life of the Cougar
spanned the Glossy Sea Blue scheme era, where it took on the fighter role,
through the mid 50’s change over to Gull Gray over White, where it was given
attack duties in lieu of more advanced fighter aircraft being introduced to the
fleet, such as the F11F Tiger, F4D Skyray, and eventually the F-8 Crusader.
Cougars soldiered on in Naval Reserve units and training squadrons before
finally being retired, although the Blue Angels used a two seat TF-9 as a VIP
aircraft for many years while flying the F11F Tiger.
Box
Contents:
The kit comes in a thick, sturdy cardboard box that opens up “pizza
style”. There are heavy tabs that insert into slots, so that the box has no
issues with coming open when you want it to stay closed. Upon opening the box, I
was almost overwhelmed by the amount and quality of the contents. Five plastic
baggies contained the smaller resin parts, while the one piece wing and one
piece fuselage were wrapped in tissue paper. The photo-etched set and decal
sheets were also protected by plastic bags. There was a 12 page instruction
sheet along with a page of color illustrations showing the various paint schemes
that can be done. The quality of the resin is hard to believe. The only surface
bubbles I encountered in the entire kit were on the underside of the wing
section behind the main gear bay and on the outer portion of the underside of
the left wing. Every other piece of resin, including the fuselage, was bubble
free. The gray resin could easily be mistaken for plastic. The surface is smooth
and recessed panel lines are exceptionally done. There are also no casting
blocks to remove from the larger parts and very little flash can be found on the
small parts.
|
Click on
images below to see larger images
|
|
|

|
|
Instruction
Sheet:
The instruction sheet is a 12 page affair that contains both print and
pictures. Page 1 is an introduction and some helpful hints on decaling and
painting. Paul Fisher also hints at more releases of Nav Air 1/32 aircraft,
including a two seat Cougar. Page 2 lists the colors of paint needed and an
overview of the photo-etched set. Pages 3-10 are the building instructions,
while page 11 contains credits and references. Page 12 finishes off the booklet
with data placement for the stenciling. The instructions are very well laid out,
with numerous pictures to show you how everything fits together. I would have
liked to have had a page showing decal placement for the major markings, but it
is easily figured out by looking at the artwork of what scheme you’re doing.
Photo-etched
Set:
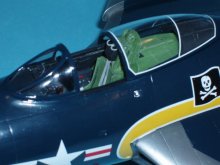
The set contains 20 different items (there are multiples of some pieces)
that include the instrument panel, perforated speed brakes, seat harnesses, rear
decking for the cockpit, wing ribs (if you want the flaps down), and numerous
other items. While the parts aren’t numbered on the actual set, they are
numbered on the instruction sheet, so there is no confusion as to what is what.
The parts themselves are easy to work with. You can manipulate them without
bending them beyond repair.
Decal Sheet:
There were 4 decal sheets in my kit. One sheet contained the small
stenciling, while the other 3 contained the different squadron markings and
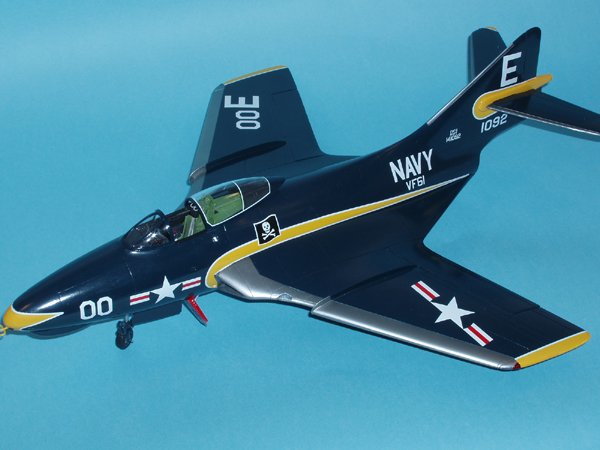
larger stenciling. Markings options are for the Blue Angels, a GSB VF-61 Jolly
Roger, a gull gray/white VF-61 Jolly Roger, and a VT-24 gull gray/white training
squadron with orange trim. The decals are printed by Microscale and go on
without any problems, including the rather intricate VF-61 trim. The blue on the
national insignias seems to be a bit too light in color, so an aftermarket set
might look better if you plan on doing a gull gray scheme. The one major goof I
found on the sheets was that for the GSB VF-61 markings, only the left side of
the yellow nose markings is included. However, this can be overcome by applying
the piece intended for the right side of the gull gray VF-61 aircraft, which has
black trim, and carefully cutting off the white trim from the duplicated nose
marking. By flipping the trim over, you can apply it over the black trim and
have it turn out just fine.
Construction:
Words can’t describe just how easily this kit went together. Within an
evening of work, the cockpit was painted and installed and the wings were joined
to the fuselage. The only filling I did on the entire model was running some Mr.
Surfacer between the wing/fuselage joint. Even then, it almost wasn’t
necessary. I started with the cockpit, which went together with very few
problems. One neat option that Paul has done is to include a rounded space ahead
of the cockpit tub that fits 12 US pennies. This is the exact amount of weight
needed to keep the model from being a tail sitter. I had a large fishing weight
handy, so I used that instead. Another helpful addition is having the instrument
dials printed as part of the instruction sheet. After it is cut out, you simply
glue it to the back of the PE instrument panel. Pay careful attention to dry
fitting the sidewall of the cockpit and the front gear well. While not
difficult, if done wrong it will present problems when you slide the tub into
the fuselage.
With the tub in place
inside the fuselage, the wings were attached and the minimal joint filled with
Mr. Surfacer. If you choose to have the flaps in the “up” position, there
will be a gap between the inner end of the flap and the fuselage. Any easy fix
to this is to glue the flap in a slightly “down” position if you don’t
want it fully deployed. This will alleviate the gap.
The rest of the model
was finished per the instructions with no major problems encountered. Since I
was doing the VF-61 scheme, I left off the horizontal stabs until after I had
decaled it.
|
Click on
images below to see larger images
|
|
|
|
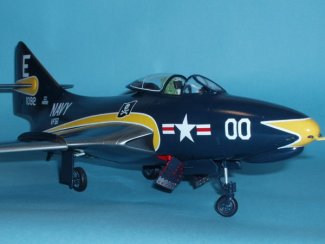
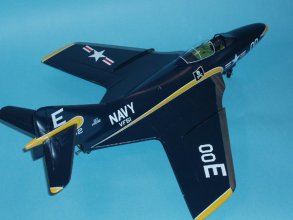
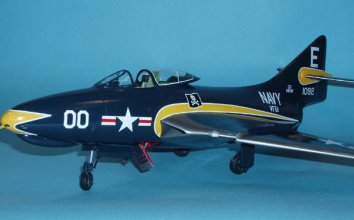
Painting and
Decaling:
I sprayed the entire model Glossy Sea Blue with Model Master Acryl paint.
Be sure to wash the resin parts before painting, as the paint may have a
difficult time adhering to the resin because of the mold release agent used.
This is especially true of acrylics. I used Post-It notes to mask off the
leading edges so that I wouldn’t run the risk of pulling up any of the blue. I
sprayed Alclad Dark Aluminum for the leading edges and than masked off the speed
brake well and painted it Insignia Red. With the paint cured, I applied the
decals. They reacted perfectly to Micro-Sol, and even the compound curves of the
VF-61 markings only took a couple of applications to get them to snuggle down.
There were a few little areas that needed some touch up yellow, but nothing that
was too time consuming or difficult. With decals down, I sprayed multiple coats
of Future and polished it with 3600 grit sanding pads to smooth it down. One
final coat of thinned Future gave it the sheen I wanted. I finished up by adding
the speed brakes and clear resin canopy. There is also a vac canopy provided
with resin framing.
Overview and
Final Thoughts:
It’s hard to believe that this is a resin kit. The fit is nothing like
I’ve ever experienced when building resin. If you have never worked with
resin, than this would be a fantastic kit to start with. It builds like an
injection molded kit, and the fit is every bit as good as Hasegawa and Tamiya.
The price is also very affordable for what you get. The kit retails for $155.00.
Other resin kits are much more than that, and aren’t nearly as nice in regards
to quality of resin and ease of build. I don’t usually build 1/32 scale, but
I’m very tempted to pick up the next release from Fisher.
Thanks to Paul
Fisher for the review sample.
Darren
|
Click on
images below to see larger images
|
|
|
|
|
|