|
The Folland Gnat TMk1
evolved from the private venture Gnat F1 which was designed as a
lightweight interceptor fighter. This
project & indeed the whole lightweight fighter concept were rejected by the
RAF at a time when they were introducing the Swift &, more
importantly, the Hunter into front line service.
The Gnat F1 went onto serve with the Indian AF with considerable
combat success (Folland were “borrowing” Supermarine’s Chilbolton airfield
for flight testing of the Gnat, when Indian AF personnel were there evaluating
the latter company’s Swift. Ironically,
they rejected the Swift but liked what they saw of the Gnat!)
& the Finnish AF.
|
Click on
images below to see larger images
|
|

|
 |
Although the RAF
rejected the Gnat fighter, a twin tandem seat trainer version was
ordered. In my opinion, the twin
seater is far more attractive than the single.
The Gnat’s high performance (which included a roll rate greater
then 360 degrees/sec.) made it an ideal advanced & weapons trainer, bridging
the gap between the Jet Provost & front line types for RAF student pilots.
The Gnats were natural mounts for the Yellow Jacks &
the Red Arrows RAF display teams. It continued to serve with the RAF
until the early 1980’s when it was replaced by the Hawk.
The
Kit.
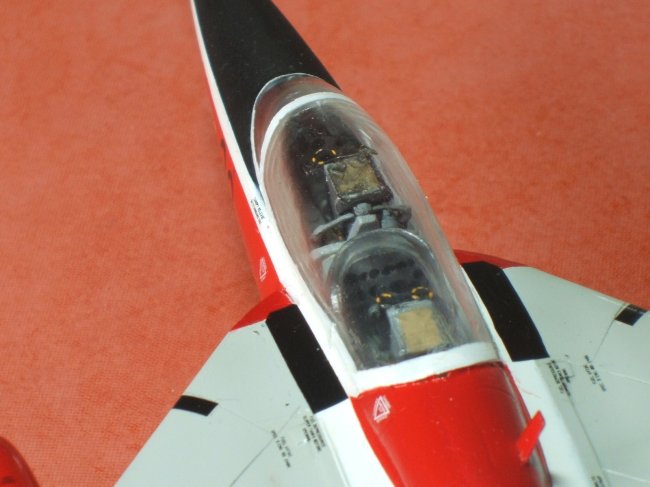
The
entire airframe including the cockpit tub is provided as injection moulded
components with white metal undercarriage, wheels, intakes, turbine, side
consoles, aerials, multi-part ejection seats & instrument panels.
Due to their “short run” nature, there is quite a bit of flash
present on the plastic parts. In
addition, they benefited from a fair amount of smoothing down with fine wet
& dry. There were three
canopies in my example: a vacform
(which I wanted to use but messed up the cutting out!), a one-piece injection
canopy and, for those who may want to pose it open but are worried about the
cutting, a two-piece injection canopy – very considerate of Aeroclub!
However, the injection canopies are quite thick & the fit wasn’t
great as a result.
The
cockpit of the Gnat was basically medium sea grey, which I applied,
picking out various knobs & dials in black or white.
By now I knew I would be using the closed injection canopy so I was just
after a basic effect. Aeroclub
have included the clear “Buccaneer Style” blast screen” in front of
the instructors position.
Assembly
is very straightforward with no major pitfalls. Plastic tubing, at the inner end
of which the rear face of the Orpheus turbojet is attached, provides the
jet pipe. This is then cemented
into one half of the fuselage with a couple of mm projecting at the tail.
The assembled & painted cockpit tub is cemented into one fuselage
half (lining up the nose wheel bay that forms the underside of the tub with the
cut out in the fuselage underside) & the fuselage can be joined.
The
wing to fuselage joint is not brilliant & required a fair amount of filling
& sanding to hide the gap. Thereafter,
I had to use thin card to replace the strengthening plates that existed in these
areas.
The
flaps are provided as separate components & I attached mine (after painting)
with a slight downward deflection.
I
dipped the canopy & blast screen in Kleer before attaching them with CA
glue. The canopy was blended in as
well as possible with PVA. I have
had a few bad experiences in the past with Kleer/Future, mainly surrounding the
disappointment experienced when the canopy masking is removed.
I tend to mask & attach the transparencies last, after all filling
& sanding is completed, then thoroughly wash the entire model to remove
grease, sanding residue etc. Then,
wash again to remove decal setting agent etc. after that stage.
Removing the masking often revealed “milky” patches on my canopies.
Only recently have I learned that this is caused by water.
These patches can be removed by reapplying Future/Kleer but this is no
help when the affected area is inside & totally inaccessible.
Now I wash before attaching the canopy & try to avoid any
further contact with water for these areas during the final, post decaling wash.
Painting
& Decalling.
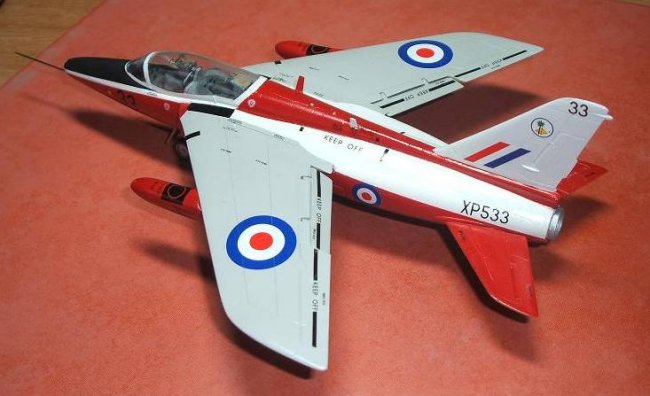
Four
schemes are provided for in the kit, covering all the major schemes applied to Gnats
during their service life. I opted
for the 4FTS scheme with Light Aircraft Grey wings, Post Office
red fuselage, white spine & fin & matt black anti-glare panel, all of
which provided some complicated masking sessions!
I first sprayed the LAG wings, then masked them off before applying white
to the spine, fin, canopy area, nose “cheat line” & rear fuselage sides.
After more masking, the fuselage & tail planes were sprayed red.
Finally, after more masking, the matt black anti-glare panel on the nose
was sprayed. This sequence was
dictated at least partly by the need to try to avoid problems with getting a
decent white finish over red or black! Xtracolour
paints provided all except the white where I find Humbrol 22 provides
better coverage & of course Humbrol 33 matt black.
Decals
are provided by the Fantasy Print Shop & were top class, with lots of
stencilling. I applied them with Micro
Sol/Set & experienced no problems whatsoever.
The sheet includes plain white discs as backing for the roundels over the
strong red or Day-Glo areas, depending upon the option chosen.
Final
assembly.
I
now attached the flaps, tanks & pitot tube (the only part not supplied in
the box – I used a needle). I
drilled out to reinforce the rather soft details provided on the white metal
wheel hubs before attaching them to the respective legs, and then the white
metal wheels, undercarriage legs & bays were painted aluminium.
I had to clip off a mm or so from the front end of
the main u/c mounts to get them to line up properly within the bays.
Finally, a clear varnish coat was sprayed overall.
|
Click on
images below to see larger images
|
|

|
|

|
Conclusions.
What a super little
kit to build, the whole thing taking less than a week.
It certainly provides an attractive & colourful model for the display
shelves. The Aeroclub site
still lists this kit as available & I recommend it to anyone with the
necessary skills & interest in the 1960’s-70’s RAF.
I’ll be on the look out for another, along with the Aeroclub Jet
Provosts.
Graham
|